AntiCheat
AntiCheat
运行卡拉比丘时,报错 Anti-Cheat Expert (ACE)
需要进一步的研究学习
暂无
遇到的问题
暂无
开题缘由、总结、反思、吐槽~~
参考文献
上面回答部分来自ChatGPT-3.5,没有进行正确性的交叉校验。
无
运行卡拉比丘时,报错 Anti-Cheat Expert (ACE)
暂无
暂无
上面回答部分来自ChatGPT-3.5,没有进行正确性的交叉校验。
无
导言
VSCODE 是 windows 项目开发的桥梁
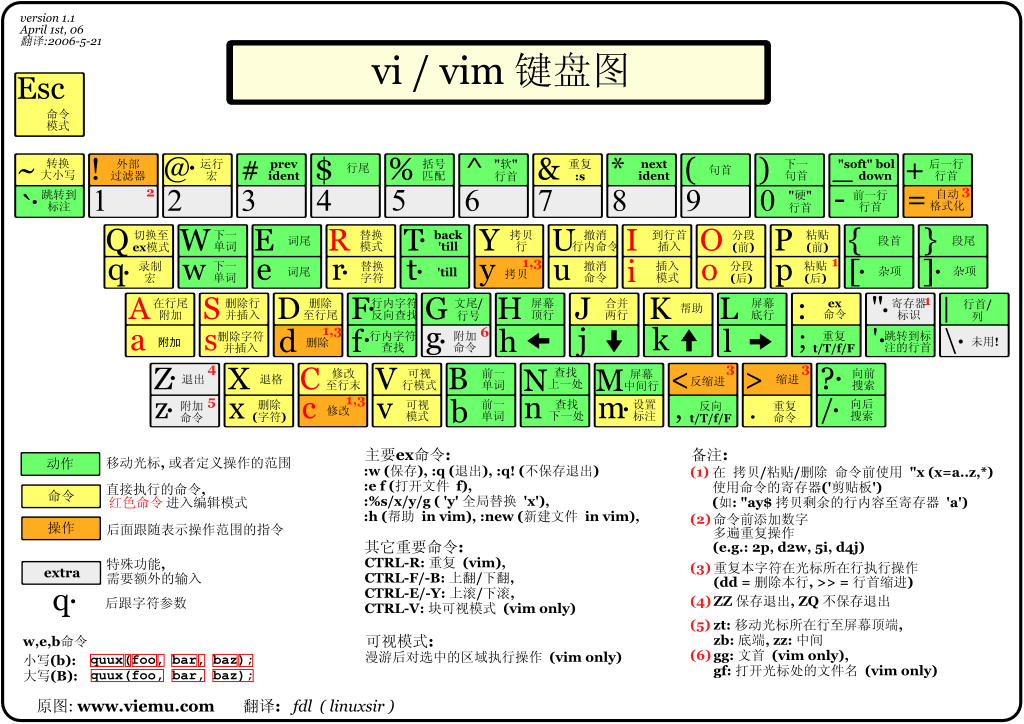
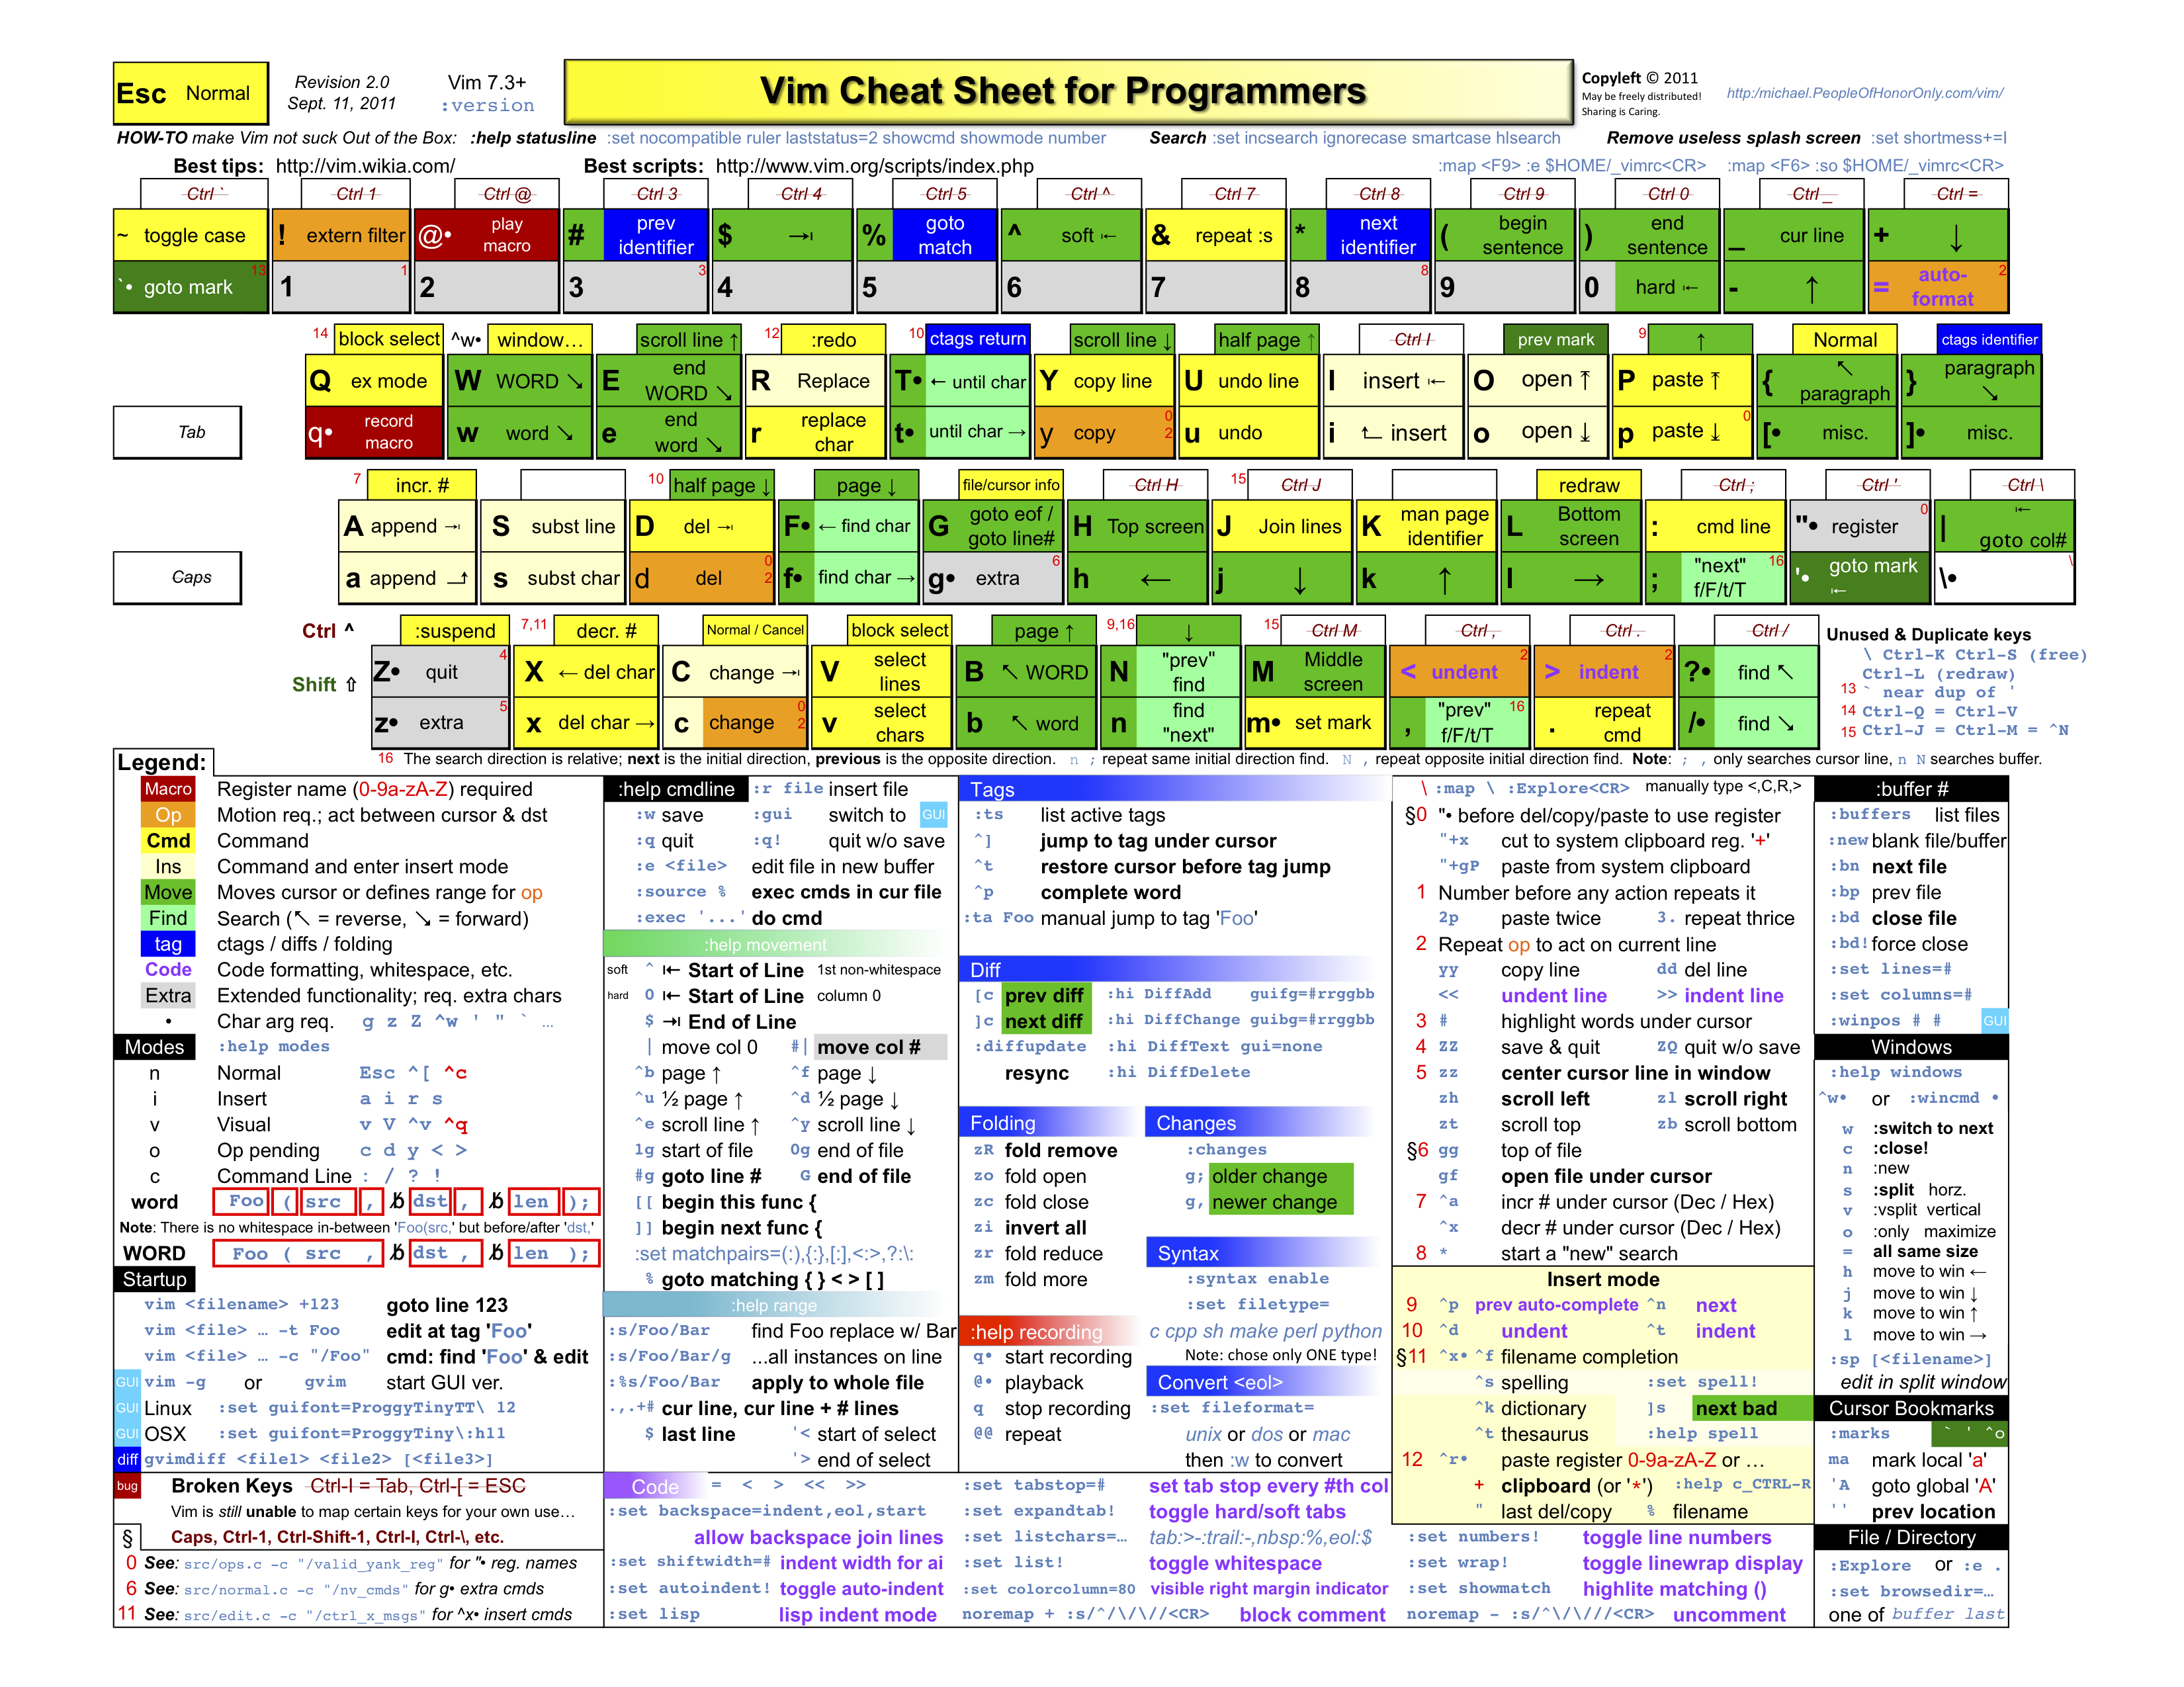
: to change mode?/ to search? to up search* to search cursor current word1,3表示替换第一行至第三行,1,$表示替换第一行到最后一行,也可以直接用%表示。c: confirm,每次替换前都会询问 e:不显示error g: globe,不询问,整个替换 i: ignore,即不区分大小写:new[CTRL] [W] s[CTRL] [W] v:split [FILENAME] #或 :sp [FILENAME]:vsplit [FILENAME] #或 :vs [FILENAME]:only[CTRL] W o:q #或者: :quitsudo apt-get install exuberant-ctagsctags -R . /path/another/include will generate tags fileecho "set tags=$PWD/tags" >> ~/.vimrc
# or
vim ~/.vimrc
# set tags=~/Download/llvm-project-main/llvm/tags
huawei programming : dev machine 使用tmux和zsh可以实现统一的开发环境
导言
作为程序员,最经常遇到的问题就是无法访问github,这无异于和世界断开连接。
linux下通过按照如下修改.ssh/config设置账号密码,并 ssh -vT git@github.com,成功后输出Hi Kirrito-k423! You've successfully authenticated, but GitHub does not provide shell access.。
# .ssh/config
Host github.com
  User 943648187@qq.com
  Hostname ssh.github.com
  PreferredAuthentications publickey
  ProxyCommand nc -X 5 -x 127.0.0.1:7890 %h %p #如果通过代理需要这句话
  IdentityFile ~/.ssh/id_rsa
  Port 443

Host *
  # Win报错取消下面三行 getpeername failed: Not a socket getsockname failed: Not a socket
  ControlMaster auto
  ControlPath /tmp/sshcontrol-%C
  ControlPersist 1d
  ServerAliveInterval 30
nc: invalid option -- 'X'
使用 yum install nmap-ncat -y
假如是windows下,如果安装了git bash,会有connect.exe的程序
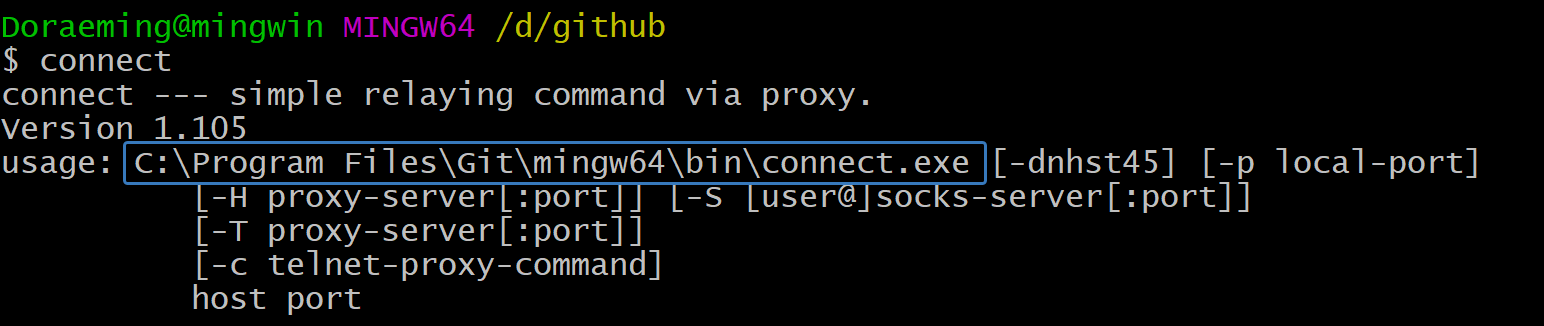
配置如下1
Host github.com
  User git
  Port 22
  Hostname github.com
  # 注意修改路径为你的路径
  IdentityFile "C:\Users\Administrator\.ssh\id_rsa"
  TCPKeepAlive yes
  # 这里的 -a none 是 NO-AUTH 模式,参见 https://bitbucket.org/gotoh/connect/wiki/Home 中的 More detail 一节
  ProxyCommand E:\\commonSoftware\\Git\\mingw64\\bin\\connect.exe -S 127.0.0.1:7890 -a none %h %p

Host ssh.github.com
  User git
  Port 443
  Hostname ssh.github.com
  # 注意修改路径为你的路径
  IdentityFile "C:\Users\Administrator\.ssh\id_rsa"
  TCPKeepAlive yes
ssh-git 与 https-git的不同
git config --global http.proxy localhost:7890 # PowerShell proxy
git config --global http.proxy "http://127.0.0.1:7890"
git config --global https.proxy "http://127.0.0.1:7890"
GIT_CURL_VERBOSE=1 GIT_TRACE=1 git clone git@github.com:Kirrito-k423/autoUpdateIpconfigPushGithub.git

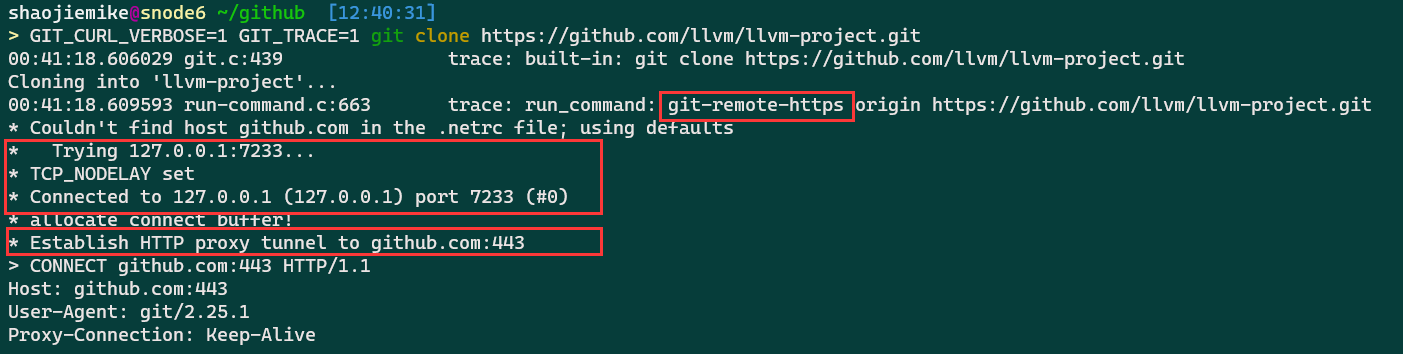
不同于linux平台的GIT_TRACE=1 git push,Windows PowerShell 平台应该如下设置:
没使用上指定config文件,git操作需要明确指定。
There are tons of identical solutions over the internet for defining proxy tunnel for git's downloads like this one, which all is by setting git's https.proxy & http.proxy config. but those answers are not working when you try to clone/push/pull etc. over the ssh protocol!
For example, by setting git config --global https.proxy socks5://127.0.0.1:9999 when you try to clone git clone git@github.org:user/repo.git it does not go through the defined sock5 tunnel!
环境实在是只有https代理, 可以利用github_token的https协议
# Method 1. git http + proxy http
git config --global http.proxy "http://127.0.0.1:1080"
git config --global https.proxy "http://127.0.0.1:1080"

# Method 2. git http + proxy shocks
git config --global http.proxy "socks5://127.0.0.1:1080"
git config --global https.proxy "socks5://127.0.0.1:1080"

# to unset
git config --global --unset http.proxy
git config --global --unset https.proxy

# Method 3. git ssh + proxy http
vim ~/.ssh/config
Host github.com
HostName github.com
User git
ProxyCommand socat - PROXY:127.0.0.1:%h:%p,proxyport=1087

# Method 4. git ssh + proxy socks
vim ~/.ssh/config
Host github.com
HostName github.com
User git
ProxyCommand nc -v -x 127.0.0.1:1080 %h %p
%h %p 是host和post的意思
或者
After some visiting so many pages, I finally find the solution to my question:
# [step 1] create a ssh-proxy
  ssh -D 9999 -qCN user@server.net

# [step 2] make git connect through the ssh-proxy
  # [current script only]
  export GIT_SSH_COMMAND='ssh -o ProxyCommand="connect -S 127.0.0.1:9999 %h %p"'
  # OR [git global setting]
  git config --global core.sshCommand 'ssh -o ProxyCommand="connect -S 127.0.0.1:9999 %h %p"'
  # OR [one-time only use]
  git clone -c=core.sshCommand 'ssh -o ProxyCommand="connect -S 127.0.0.1:9999 %h %p"' git@github.com:user/repo.git
  # OR [current repository use only]
  git config core.sshCommand 'ssh -o ProxyCommand="connect -S 127.0.0.1:9999 %h %p"'
To install connect on Ubuntu:
ssh -vT -o "ProxyCommand connect -S 127.0.0.1:7890 %h %p" git@github.com
ssh -vT -o "ProxyCommand nc -X 5 -x 127.0.0.1:7890 %h %p" git@github.com
# 使用HTTP 代理
ssh -o ProxyCommand='corkscrew proxy.net 8888 %h %p' user@server.net
ssh -o ProxyCommand='proxytunnel -p proxy.net:8888 -P username -d %h:%p' user@server.net
post request forward is an all-in-one solution.
interface: warp
  public key: fcDZCrGbcpz3sKFqhBw7PtdInygUOtEJfPAs08Wwplc=
  private key: (hidden)
  listening port: 51825

peer: bmXOC+F1FxEMF9dyiK2H5/1SUtzH0JuVo51h2wPfgyo=
  endpoint: [2606:4700:d0::a29f:c001]:1701
  allowed ips: 172.16.0.0/24, 0.0.0.0/0, ::/0
  latest handshake: 89 days, 23 hours, 15 minutes, 28 seconds ago
  transfer: 3.51 GiB received, 1.71 GiB sent
  persistent keepalive: every 25 seconds
latest handshake: 89 days ago demonstrate wg is done for a long time. At the same time mtr github.com shows no output prove the bad situation.
STEP1: first try is to bring the wg-proxy up again
python register.py #自动生成warp-op.conf,warp.conf和warp-helper
mv warp-helper /etc/default
vim /etc/config/network #填写warp-op.conf内容,修改只用替换option private_key 和 ipv6 的 list addresses 即可
ifup warp #启动warp, 代替wg-quick up warp.conf
and test brainiac machine is back online
Sometimes,it‘s the big log fault.
# find file
find . -type f -name "zsim.log.0" -size +10M
# find the most repeated lines
head -n 10000 your_file.txt | sort | uniq -c | sort -nr | head
# delete partten line in files
sed -i '/\[S 0\] WARN: \[6\] ContextChange, reason SIGRETURN, inSyscall 1/d' /staff/shaojiemike/github/PIA_huawei/log/zsim/chai-n/hsti/1000/cpu_tlb/zsim.log.0

# conbine two command
find . -type f -name "zsim.log.0" -size +10M -print0 | xargs -0 sed -i '/字符串模式/d'
# or just save the tail (sth wrong needed test)
find . -type f -name "zsim.log.0" -size +1M -exec bash -c 'tail -n 2000 "$1" > "$1"_back ' _ {} \;
t00906153@A2305023964 MINGW64 ~/github
$ git clone https://github.com/jeremy-rifkin/cpptrace.git
Cloning into 'cpptrace'...
fatal: unable to access 'https://github.com/jeremy-rifkin/cpptrace.git/': SSL certificate problem: self-signed certificate in certificate chain
error: RPC failed; curl 18 transfer closed with outstanding read data remaining
出现于使用https协议,下载大仓库时,出现该错误。
depth=1参数,只下载最新提交。之后下好后能适应unshallow复原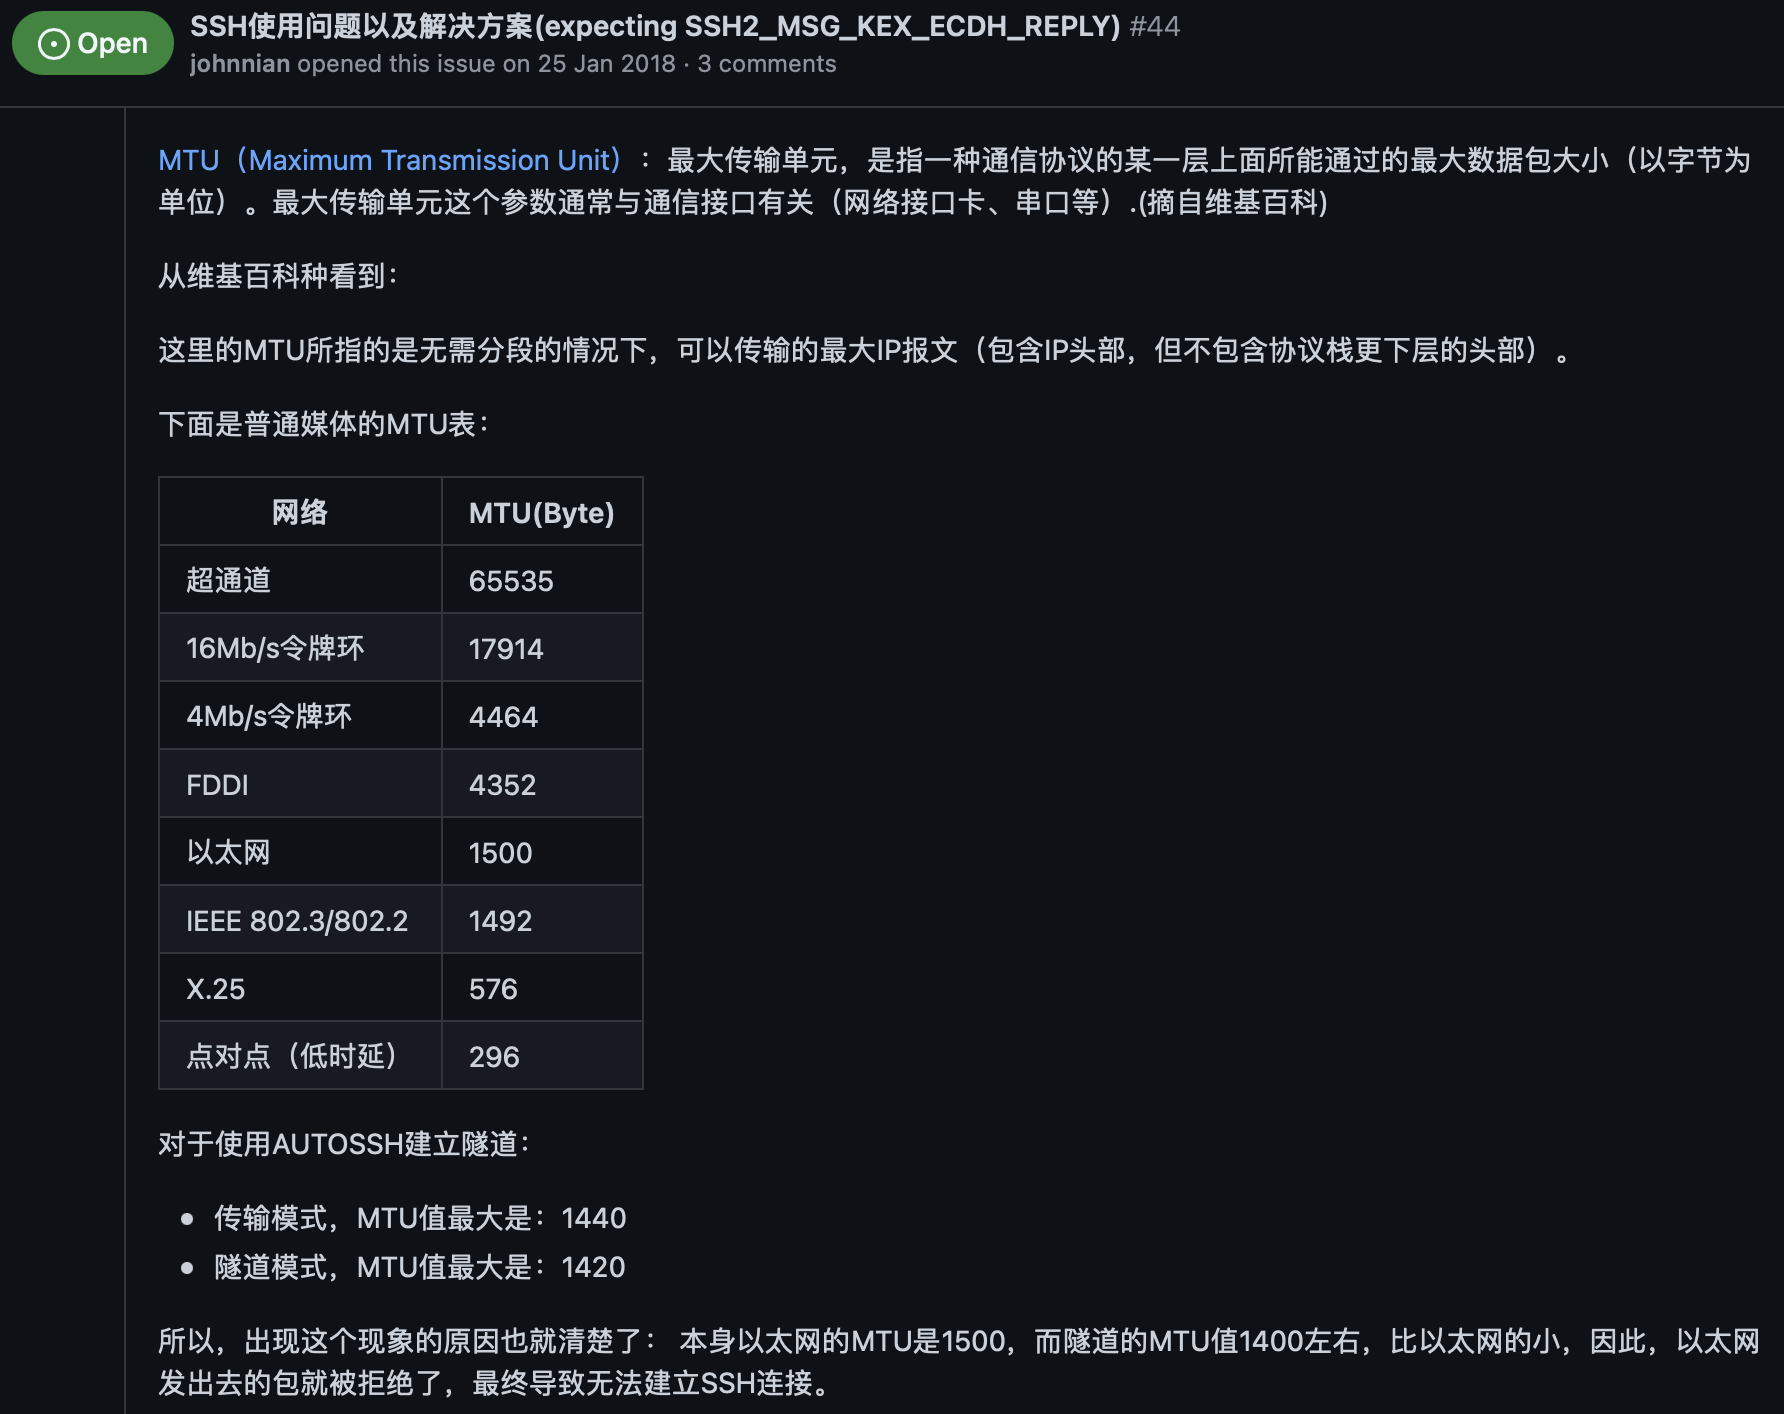
设置mtu解决:
STEP1:
eno0: flags=4163<UP,BROADCAST,RUNNING,MULTICAST>  mtu 1500
        inet 202.38.73.217  netmask 255.255.255.0  broadcast 202.38.73.255
        inet6 fe80::ae1f:6bff:fe8a:e4ba  prefixlen 64  scopeid 0x20<link>
        inet6 2001:da8:d800:811:ae1f:6bff:fe8a:e4ba  prefixlen 64  scopeid 0x0<global>
        inet6 2001:da8:d800:730:ae1f:6bff:fe8a:e4ba  prefixlen 64  scopeid 0x0<global>
        ether ac:1f:6b:8a:e4:ba  txqueuelen 1000  (以太网)
        RX packets 12345942  bytes 2946978044 (2.9 GB)
        RX errors 0  dropped 1438318  overruns 0  frame 0
        TX packets 4582067  bytes 675384424 (675.3 MB)
        TX errors 0  dropped 0 overruns 0  carrier 0  collisions 0
STEP2:
STEP3:
导言
Git命令的基本使用。
虽然MPI属于OSI参考模型的第5层和更高层,但实现可以覆盖大多数层,其中在传输层中使用套接字和传输控制协议(TCP)。
MPI hardware research focuses on implementing MPI directly in hardware, for example via processor-in-memory, building MPI operations into the microcircuitry of the RAM chips in each node. By implication, this approach is independent of language, operating system, and CPU, but cannot be readily updated or removed. MPI硬件研究的重点是直接在硬件中实现MPI,例如通过内存处理器,将MPI操作构建到每个节点中的RAM芯片的微电路中。通过暗示,这种方法独立于语言、操作系统和CPU,但是不能容易地更新或删除。
Another approach has been to add hardware acceleration to one or more parts of the operation, including hardware processing of MPI queues and using RDMA to directly transfer data between memory and the network interface controller(NIC 网卡) without CPU or OS kernel intervention. 另一种方法是将硬件加速添加到操作的一个或多个部分,包括MPI队列的硬件处理以及使用RDMA在存储器和网络接口控制器之间直接传输数据,而无需CPU或OS内核干预。
进程间通信都是Inter-process communication(IPC)的一种。常见有如下几种:
|mkfifo,具有p的文件属性线程共享存储器编程模型(如Pthreads和OpenMP)和消息传递编程(MPI/PVM)可以被认为是互补的,并且有时在具有多个大型共享存储器节点的服务器中一起使用。
后四个是MPI-2独有的
#include <unistd.h>
char hostname[100];
gethostname(hostname,sizeof(hostname));
printf( "Hello world from process %d of %d: host: %s\n", rank, size, hostname);
输出X个当前机器hostname
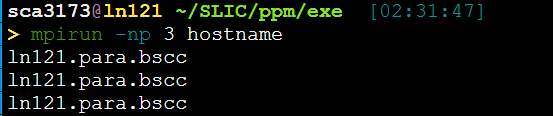
mpirun -np 6 -machinefile ./machinelist ./a.out 即可多节点执行。
MPI_Finalize()之后 ,MPI_Init()之前 https://www.open-mpi.org/doc/v4.0/man3/MPI_Init.3.php
不同的进程是怎么处理串行的部分的?都执行(重复执行?)。执行if(rank=num),那岂不是还要同步MPI_Barrier()。
而且写同一个文件怎么办?
MPI的两种最基本的并行程序设计模式 即对等模式和主从模式。
对等模式:各个部分地位相同,功能和代码基本一致,只不过是处理的数据或对象不同,也容易用同样的程序来实现。
主从模式:分为主进程和从进程,程序通信进程之间的一种主从或依赖关系 。MPI程序包括两套代码,主进程运行其中一套代码,从进程运行另一套代码。
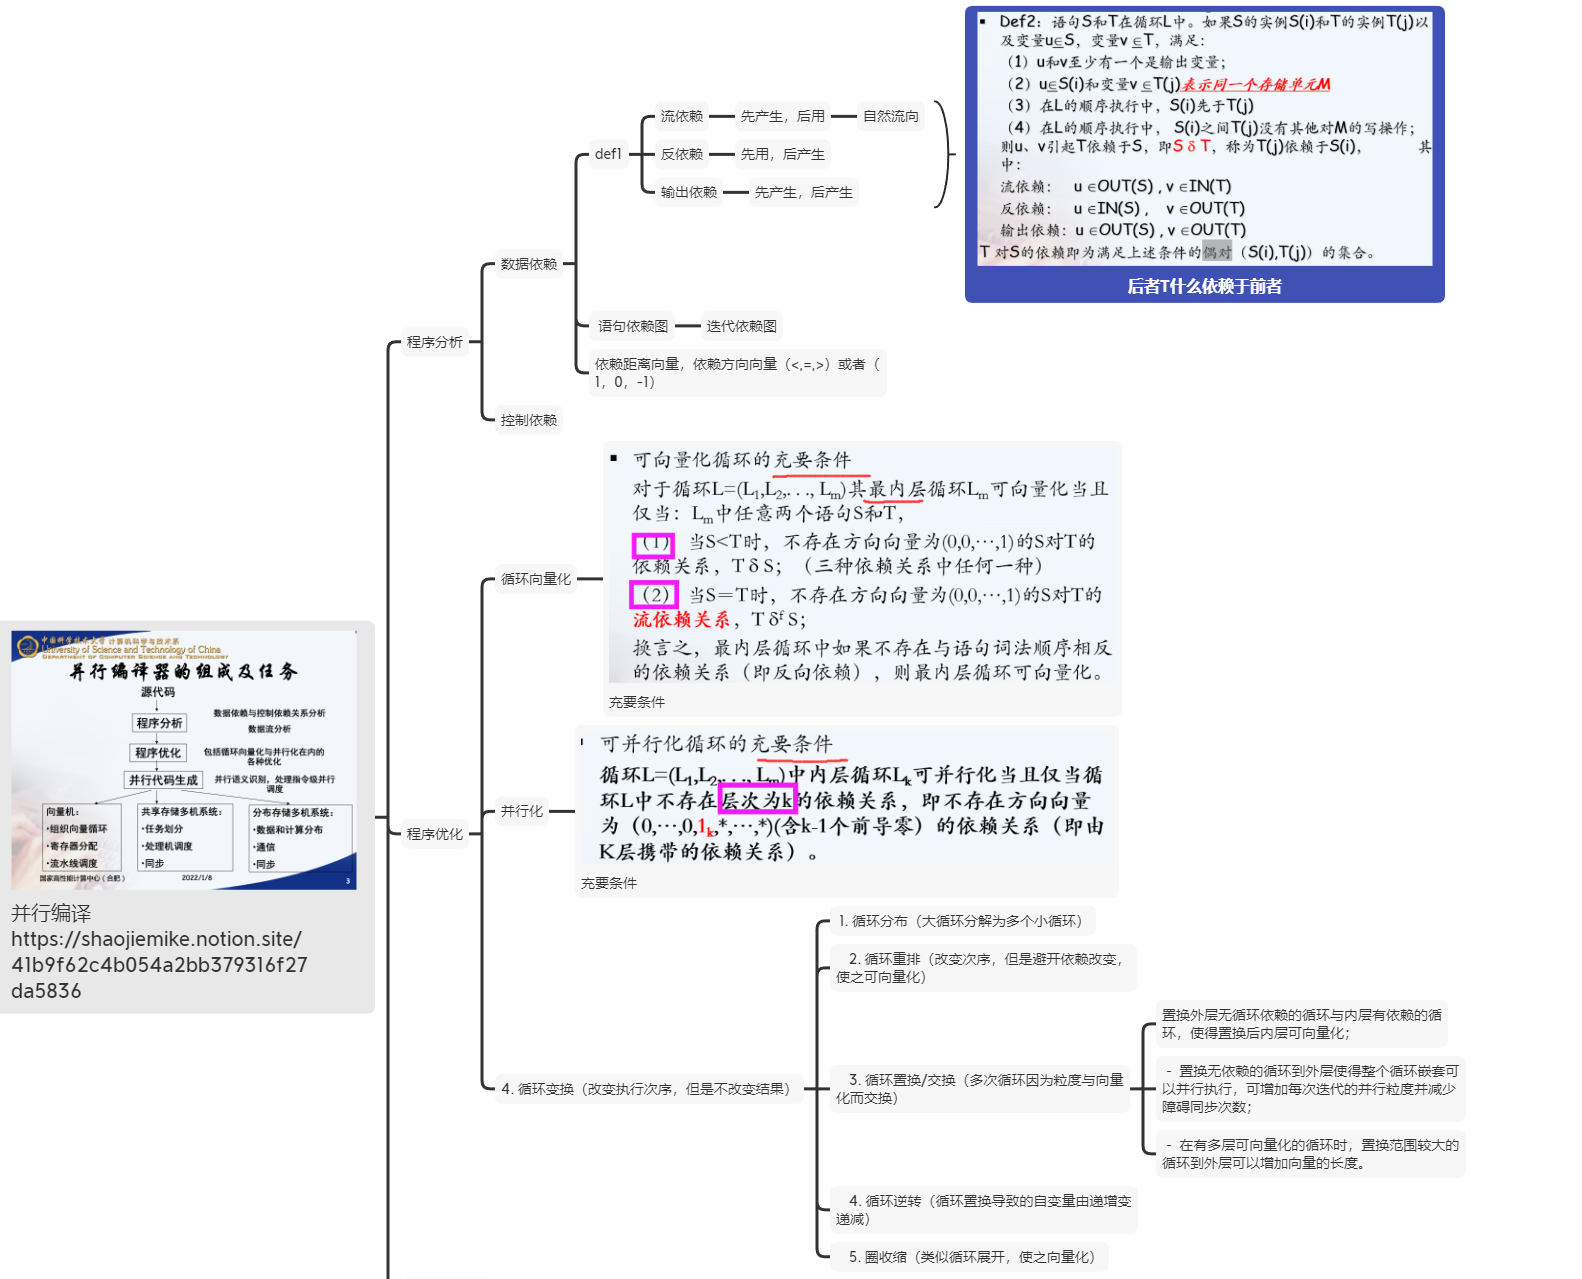 圈收缩(cycle shrinking)-此变换技术一般用于依赖距离大于1的循环中,它将一个串行循环分成两个紧嵌套循环,其中外层依然串行执行,而内层则是并行执行(一般粒度较小)
https://shaojiemike.notion.site/41b9f62c4b054a2bb379316f27da5836

MPI_PACKED预定义数据类型被用来实现传输地址空间不连续的数据项 。
int MPI_Pack(const void *inbuf,
             int incount,
             MPI_Datatype datatype, void *outbuf, int outsize, int *position, MPI_Comm comm)
int MPI_Unpack(const void *inbuf, int insize, int *position,
               void *outbuf, int outcount, MPI_Datatype datatype, MPI_Comm comm)
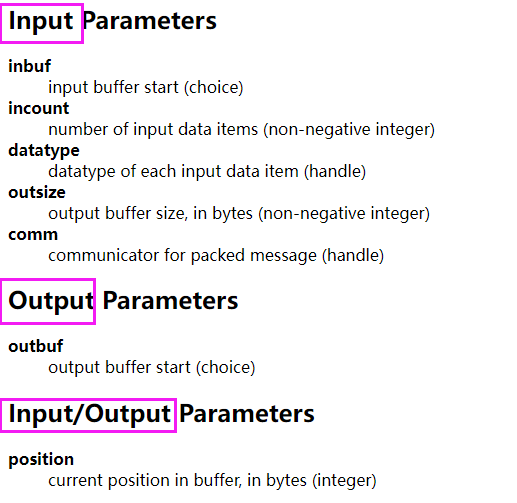 The input value of position is the first location in the output buffer to be used for packing. position is incremented by the size of the packed message,
and the output value of position is the first location in the output buffer following the locations occupied by the packed message. The comm argument is the communicator that will be subsequently used for sending the packed message.
//Returns the upper bound on the amount of space needed to pack a message
int MPI_Pack_size(int incount, MPI_Datatype datatype, MPI_Comm comm, int *size)
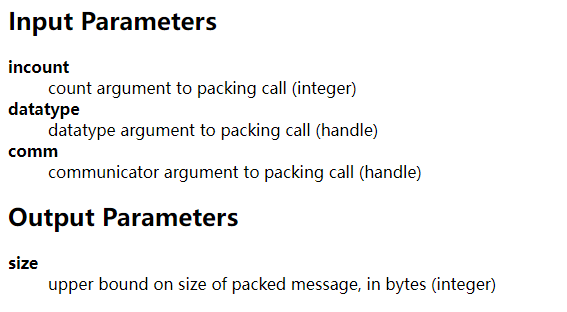 例子:
例子:
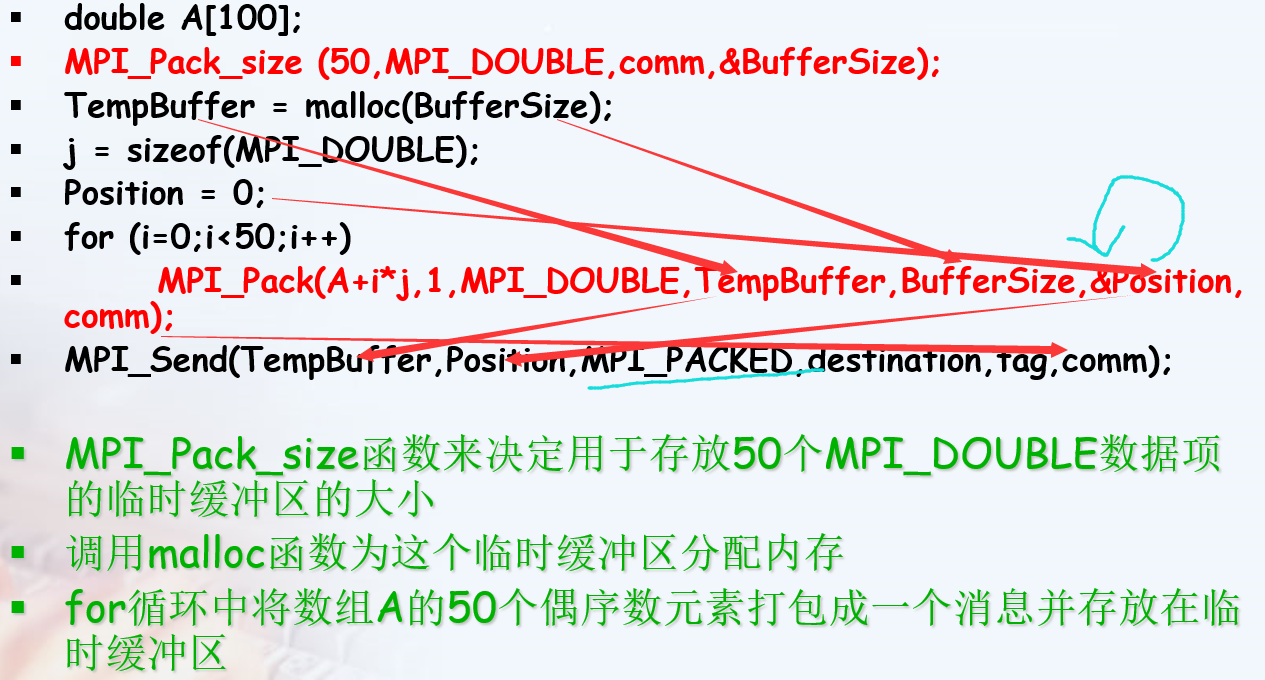 这里的
这里的A+i*j应该写成A+i*2吧???
来定义由数据类型不同且地址空间不连续的数据项组成的消息。
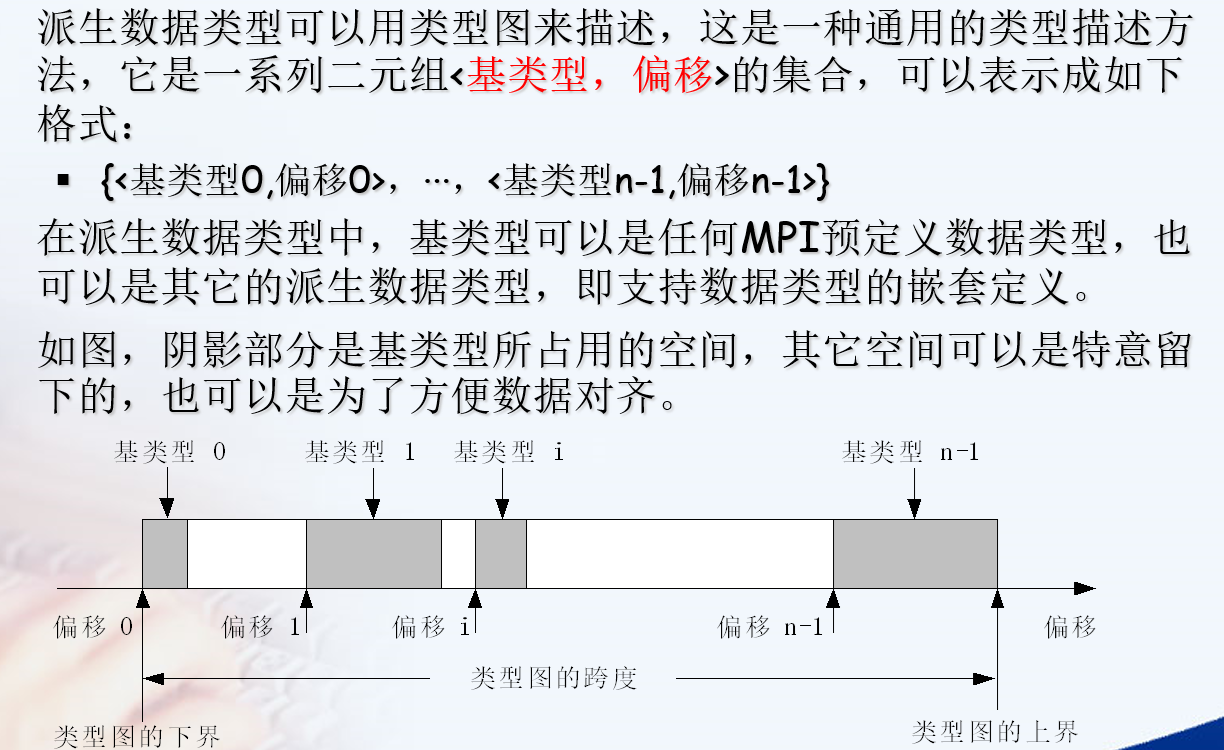
//启用与弃用数据类型
int MPI_Type_commit(MPI_Datatype * datatype)
int MPI_Type_free(MPI_Datatype * datatype)
//相同数据类型
int MPI_Type_contiguous(int count, MPI_Datatype oldtype, MPI_Datatype * newtype)
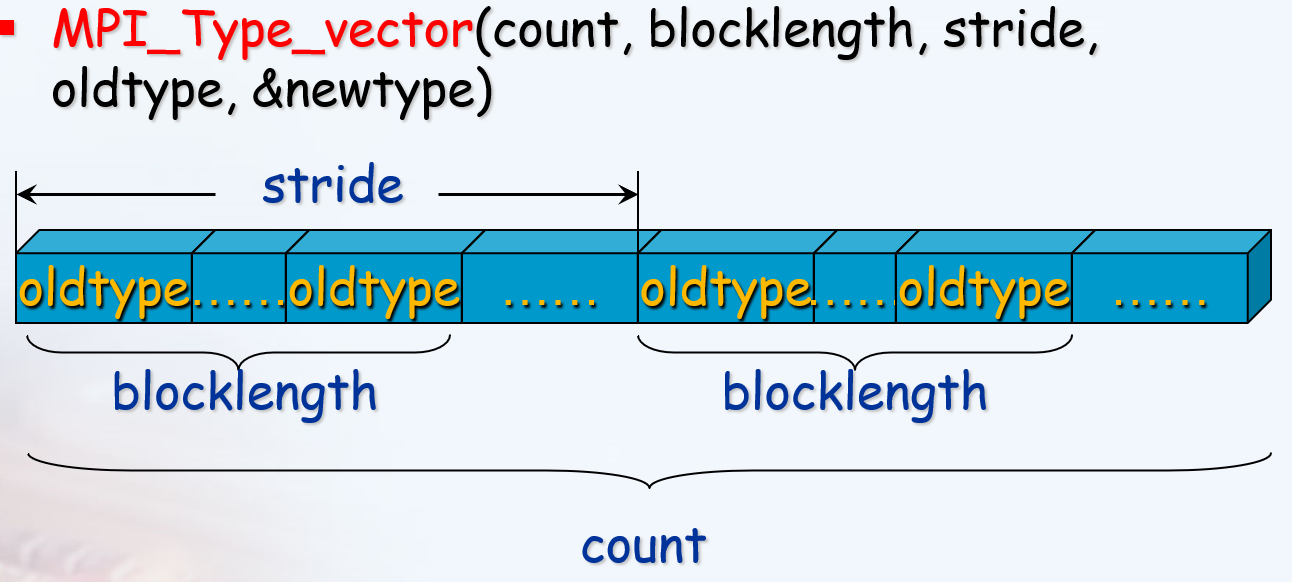
//成块的相同元素组成的类型,块之间具有相同间隔
int MPI_Type_vector(int count,
                    int blocklength, int stride, MPI_Datatype oldtype, MPI_Datatype * newtype)
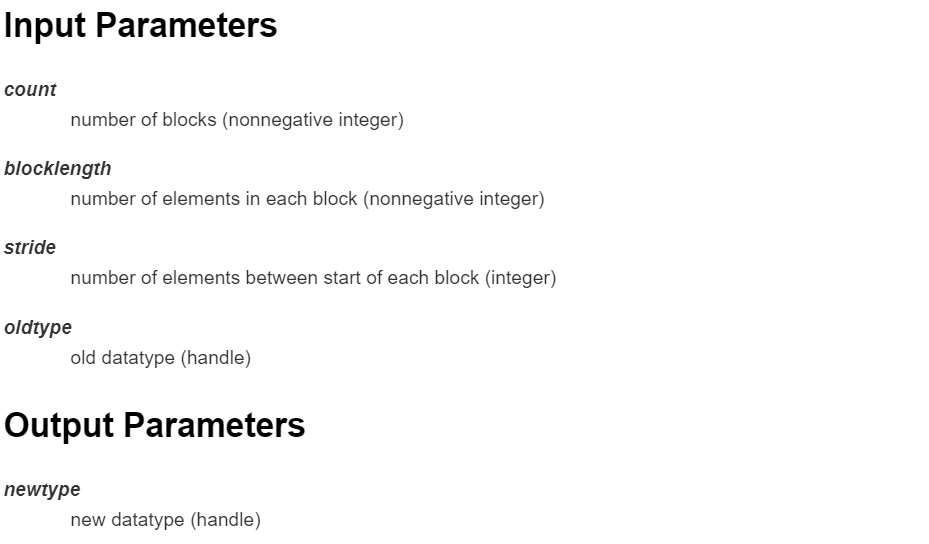
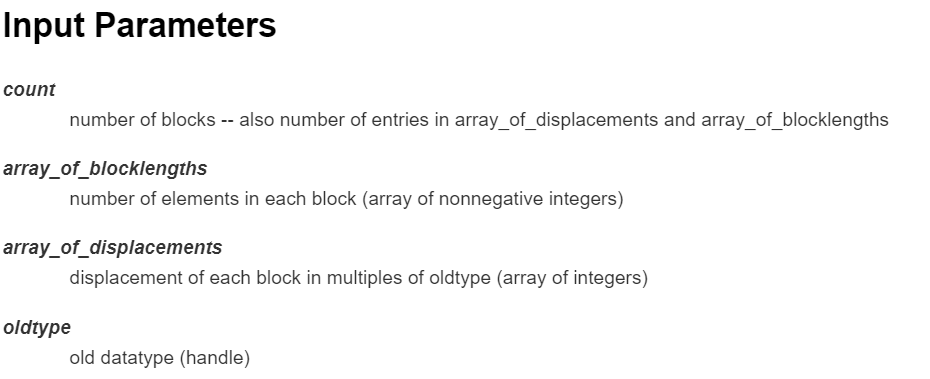
//成块的相同元素组成的类型,块长度和偏移由参数指定
int MPI_Type_indexed(int count,
                     const int *array_of_blocklengths,
                     const int *array_of_displacements,
                     MPI_Datatype oldtype, MPI_Datatype * newtype)
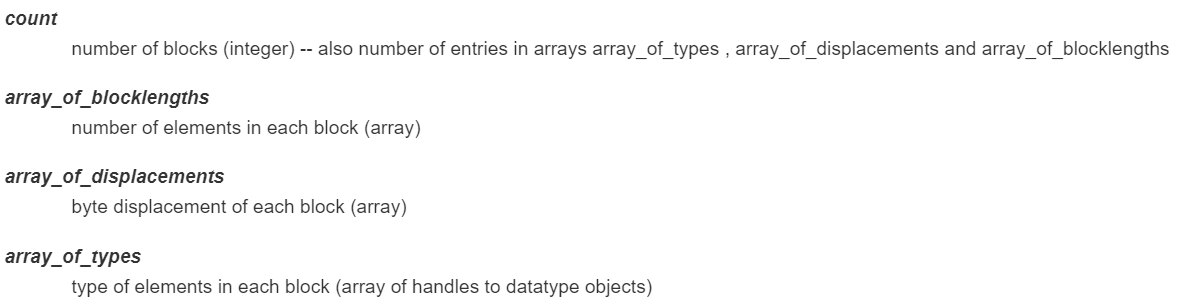
//由不同数据类型的元素组成的类型, 块长度和偏移(肯定也不一样)由参数指定
int MPI_Type_struct(int count,
                    int *array_of_blocklengths,
                    MPI_Aint * array_of_displacements,
                    MPI_Datatype * array_of_types, MPI_Datatype * newtype)
MPI_Cart_create 确定了虚拟网络每一维度的大小后,需要为这种拓扑建立通信域。组函数MPI_Cart_create可以完成此任务,其声明如下:
// Makes a new communicator to which topology拓扑 information has been attached
int MPI_Cart_create(
    MPI_Comm old_comm,//旧的通信域。这个通讯域中的所有进程都要调用该函数
    int dims,//网格维数 number of dimensions of cartesian grid (integer)
    int* size,//长度为dims的数组,size[j]是第j维的进程数, integer array of size ndims specifying the number of processes in each dimension
    int* periodic,//长度为dims的数组,如果第j维有周期性,那么periodic[j]=1,否则为0
    int reorder,//进程是否能重新被编号,如果为0则进程在新的通信域中仍保留在旧通信域的标号
    MPI_Comm* cart_comm//该函数返回后,此变量将指向新的笛卡尔通信域
);

int MPI_Cart_rank(MPI_Comm comm, const int coords[], int *rank)
//Determines process rank in communicator given Cartesian location
//该函数的作用是通过进程在网格中的坐标获得它的进程号

int MPI_Cart_coords(MPI_Comm comm, int rank, int maxdims, int coords[])
//Determines process coords in cartesian topology given rank in group
//该函数的作用是确定某个线程在虚拟网格中的坐标
int MPI_Comm_create(MPI_Comm comm, MPI_Group group, MPI_Comm * newcomm)
//Creates a new communicator

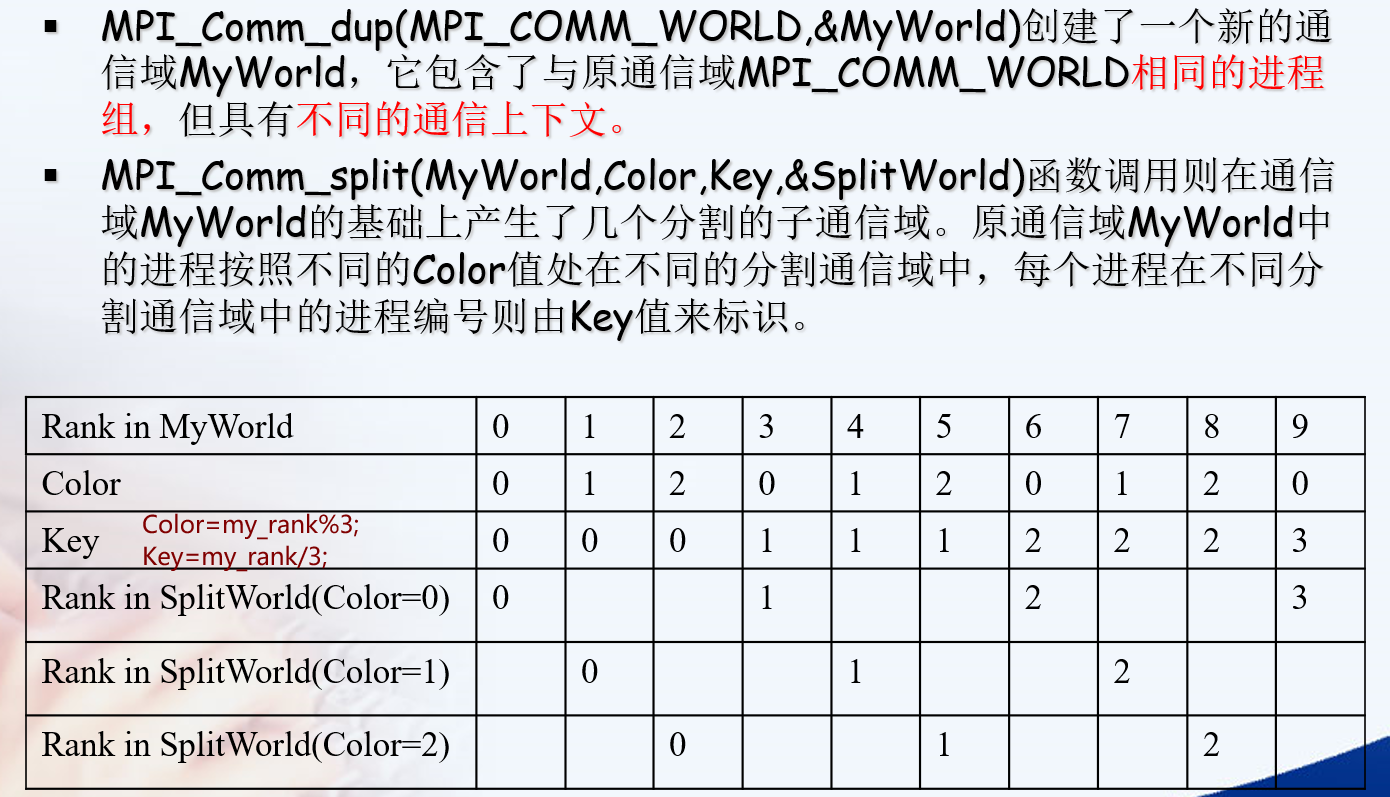
int MPI_Comm_split(MPI_Comm comm, int color, int key, MPI_Comm * newcomm)
将某个通信域进一步划分为几组
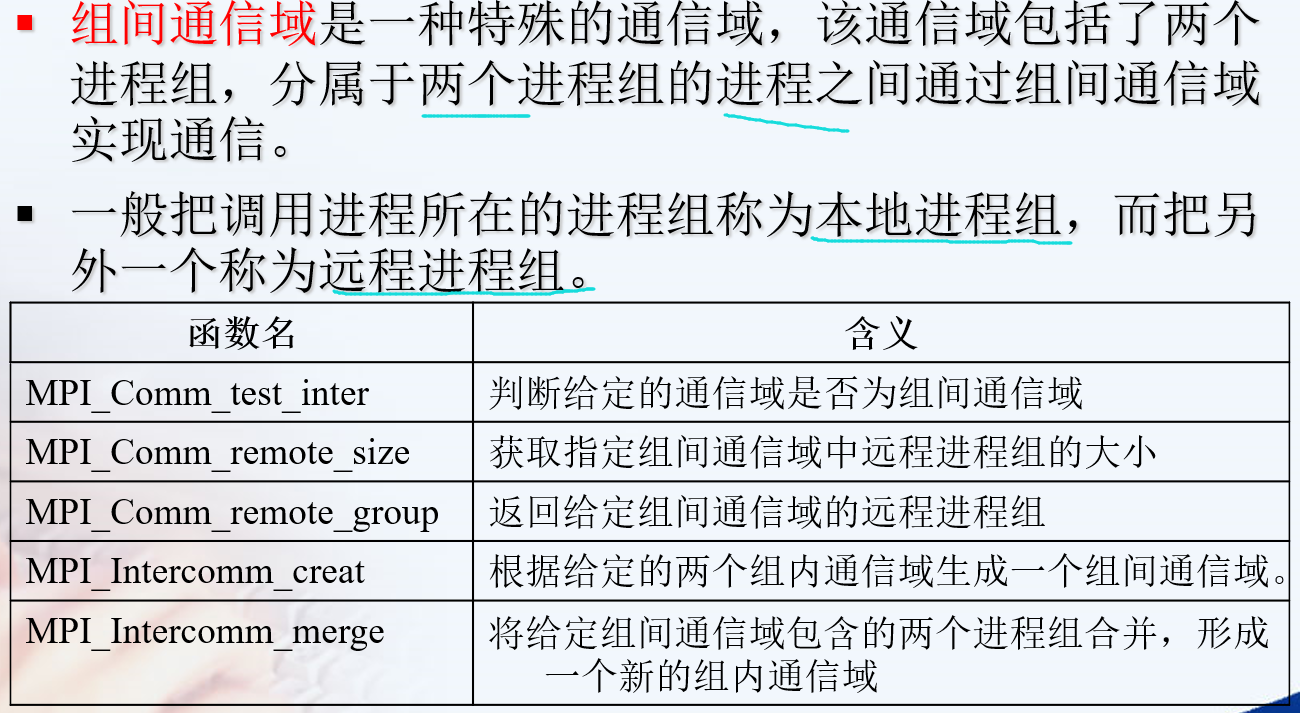
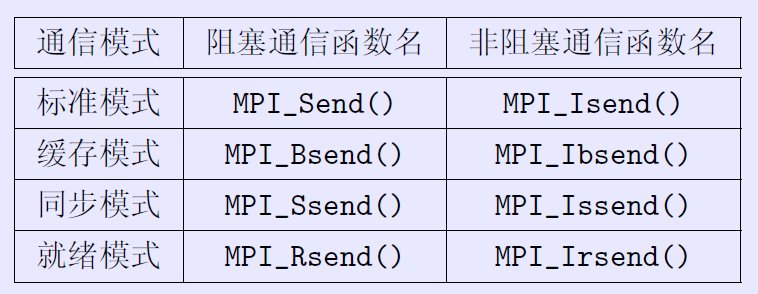
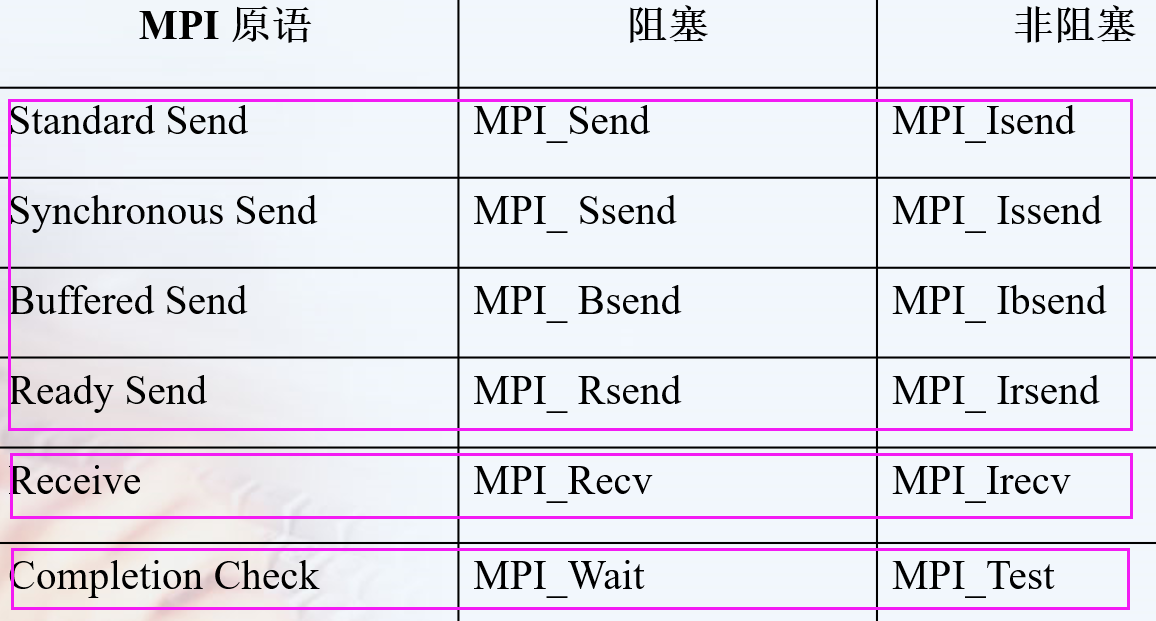 特殊的函数
特殊的函数
int MPI_Sendrecv(const void *sendbuf, int sendcount, MPI_Datatype sendtype,
                 int dest, int sendtag,
                 void *recvbuf, int recvcount, MPI_Datatype recvtype,
                 int source, int recvtag, MPI_Comm comm, MPI_Status * status)
int MPI_Sendrecv_replace(void *buf, int count, MPI_Datatype datatype,
                         int dest, int sendtag, int source, int recvtag,
                         MPI_Comm comm, MPI_Status * status)
There is also another error. The MPI standard requires that the send and the receive buffers be disjoint不相交 (i.e. they should not overlap重叠), which is not the case with your code. Your send and receive buffers not only overlap but they are one and the same buffer. If you want to perform the swap in the same buffer, MPI provides the MPI_Sendrecv_replace operation.
//MPI标准阻塞通信函数,没发出去就不会结束该命令。
MPI_Send(sb, buf_size, MPI_INT, other, 1, MPI_COMM_WORLD);
                /*其中sb为发送缓冲区首地址,
                  buf_size为发送数据量,
                  MPI_INT 为发送数据的类型,
                  other为发送目标进程,(发送给other)
                  1的位置为tag,
                  MPI_COMM_WORLD为通信子*/
MPI_Recv(rb, buf_size, MPI_INT, other, 1, MPI_COMM_WORLD, &status);
                /*与发送类似,从other接收消息,status见下面*/
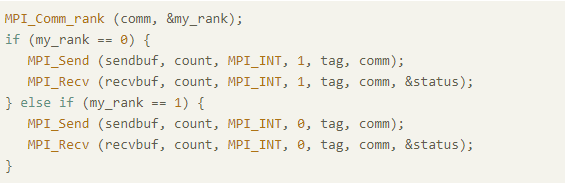
可能大家会想到这会死锁,如下图: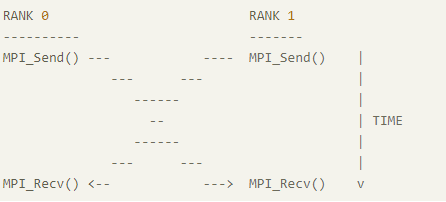
但是实际情况可能并不会死锁,这与调用的MPI库的底层实现有关。

MPI_Send将阻塞,直到发送方可以重用发送方缓冲区为止。当缓冲区已发送到较低的通信层时,某些实现将返回给调用方。当另一端有匹配的MPI_Recv()时,其他一些将返回到呼叫者。
但是为了避免这种情况,可以调换Send与Recv的顺序,或者使用MPI_Isend()或MPI_Issend()代替非阻塞发送,从而避免死锁。
/*
        梯形积分法,计算y=sin x 在[0,pi]上的积分
        @ trap 梯形积分串行程序
        @total_inte 最终积分结果
        */
#include "stdafx.h"
#include <stdio.h>
#include <stdlib.h>
#include <string.h>
#include <iostream>
#include<math.h>
#include "mpi.h"
using namespace std;

const double a = 0.0;
const double b = 3.1415926;
int n = 100;
double h = (b - a) / n;

double trap(double a, double b, int n, double h)
{
    double*x = new double[n + 1];
    double*f = new double[n + 1];
    double inte = (sin(a) + sin(b)) / 2;
    for (int i = 1; i<n + 1; i++) {
        x[i] = x[i - 1] + h;   /*x_0=a,x_n=b*/
        f[i] = sin(x[i]);
        inte += f[i];
    }
    inte = inte*h;    /* inte=h*[f(a)/2+f(x_1)+...f(x_{n-1})+f(b)/2]*/
    return inte;
}

int main(int argc, char * argv[])
{
    int myid, nprocs;
    int local_n;
    double local_a;
    double local_b;
    double total_inte;

    MPI_Init(&argc, &argv);
    MPI_Comm_rank(MPI_COMM_WORLD, &myid);   /* get current process id */
    MPI_Comm_size(MPI_COMM_WORLD, &nprocs); /* get number of processes */

    local_n = n / nprocs; //任务划分
    local_a = a + myid*local_n*h;
    local_b = local_a + local_n*h;
    double local_inte = trap(local_a, local_b, local_n, h);

    if (myid != 0) //通信结果
    {
        MPI_Send(&local_inte, 1, MPI_DOUBLE, 0, 0, MPI_COMM_WORLD);
    }
    else
    {
        total_inte = local_inte;
        for (int i = 1; i<nprocs; i++)
        {
            MPI_Recv(&local_inte, 1, MPI_DOUBLE, i, 0, MPI_COMM_WORLD, MPI_STATUS_IGNORE);
            total_inte += local_inte;
        }
    }
    if (myid == 0)
    {
        printf("integral output is %d", total_inte);
    }
    MPI_Finalize();

    return 0;
}
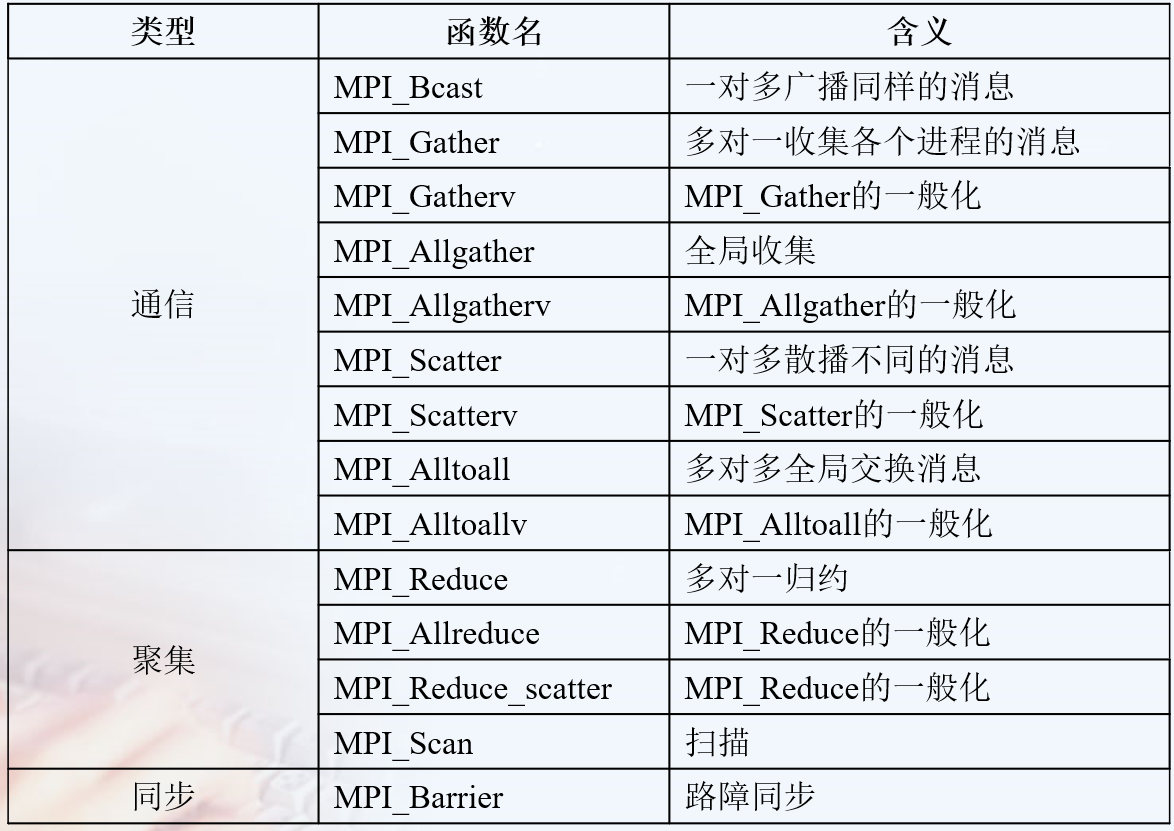
一个进程组中的所有进程都参加的全局通信操作。
实现三个功能:通信、聚集和同步。 1. 通信功能主要完成组内数据的传输 2. 聚集功能在通信的基础上对给定的数据完成一定的操作 3. 同步功能实现组内所有进程在执行进度上取得一致
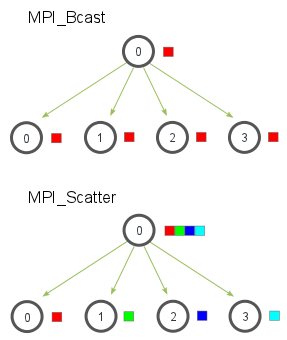
//将一个进程中得数据发送到所有进程中的广播函数
MPI_Bcast(void* data_p,int count,MPI_Datatype datatype, int scr_process,MPI_Comm comm);
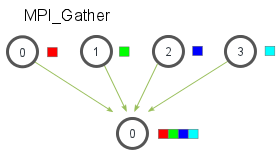
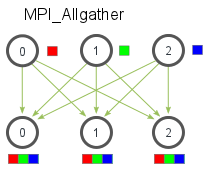
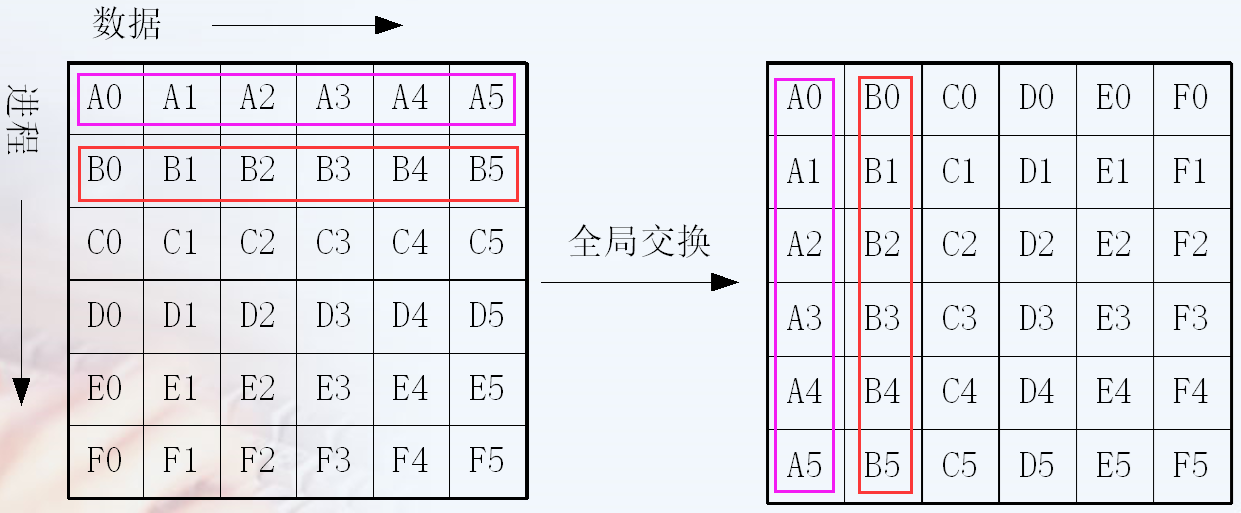
int MPI_Allgather(void * sendbuff, int sendcount, MPI_Datatype sendtype,
                  void * recvbuf, int recvcount, MPI_Datatype recvtype,
                  MPI_Comm comm)
int MPI_Allgatherv(void * sendbuff, int sendcount, MPI_Datatype sendtype,
                   void * recvbuf, int * recvcounts, int * displs,
                   MPI_Datatype recvtype, MPI_Comm comm)
number of elements received from any process (integer)

MPI聚合的功能分三步实现 * 首先是通信的功能,即消息根据要求发送到目标进程,目标进程也已经收到了各自需要的消息; * 然后是对消息的处理,即执行计算功能; * 最后把处理结果放入指定的接收缓冲区。
MPI提供了两种类型的聚合操作: 归约和扫描。
int MPI_Reduce(
    void *input_data, /*指向发送消息的内存块的指针 */
    void *output_data, /*指向接收(输出)消息的内存块的指针 */
    int count,/*数据量*/
    MPI_Datatype datatype,/*数据类型*/
    MPI_Op operator,/*规约操作*/
    int dest,/*要接收(输出)消息的进程的进程号*/
    MPI_Comm comm);/*通信器,指定通信范围*/
// operator可以有:求最大值 MPI_MAX 最小值 求累加和 累乘积 逻辑操作

// 求和语句
MPI_Reduce(&local_int,&total_int,1,MPI_DOUBLE,MPI_SUM,0,MPI_COMM_WORLD);

//另外有时候需要将得到的结果放入所有的线程中
MPI_Allreduce(void* input_data_p,void*output_data_p, int count,MPI_Datatype datatype,MPI_Op operator, MPI_Comm comm);

//每一个进程都对排在它前面的进程进行归约操作。
MPI_scan(SendAddress, RecvAddress, Count, Datatype, Op, Comm)
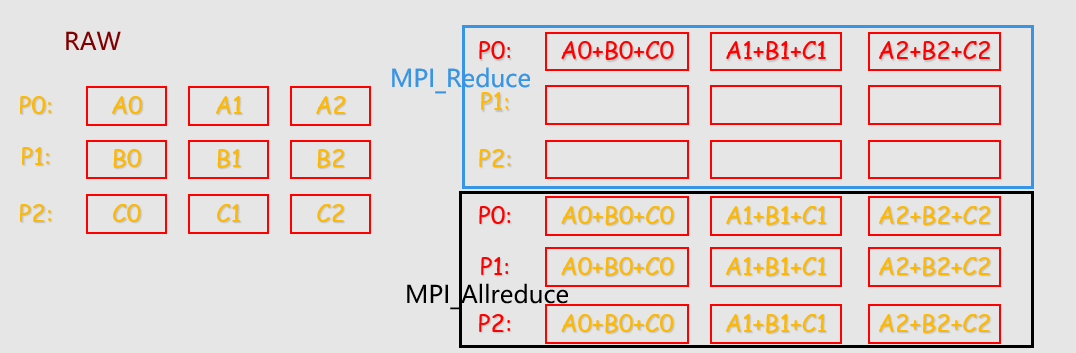
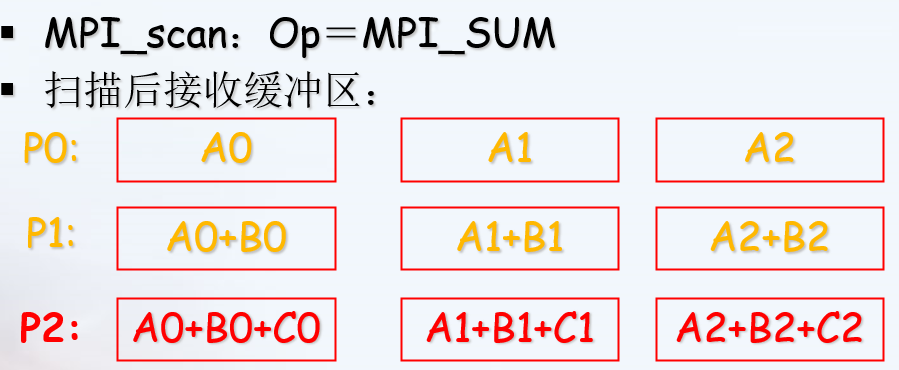
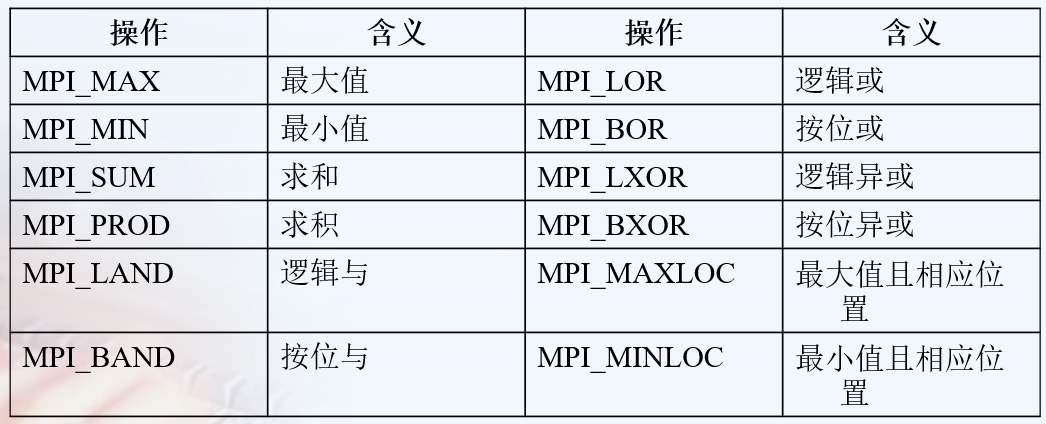
int MPI_Op_create(MPI_User_function *function, int commute, MPI_Op *op)

//function    用户自定义的函数(函数)
//commute   如果commute=ture, 则此操作同时也是可交换的。如果commute=false,则此操作不满足交换律。
            else 按进程号升序进行Op操作
//op              自定义归约操作名

int  MPI_Op_free(MPI_Op *op) //将用户自定义的归约操作撤销, 将op设置成MPI_OP_NULL。
typedef void MPI_User_function(void *invec, void *inoutvec, int *len, MPI_Datatype *datatype)
必须具备四个参数:
1. invec 和 inoutvec 分别指出将要被归约的数据所在的缓冲区的首地址,
2. len指出将要归约的元素的个数, datatype 指出归约对象的数据类型
也可以认为invec和inoutvec 是函数中长度为len的数组, 归约的结果重写了inoutvec 的值。
 /*
@local_inte:send buffer;
@total_inte:receive buffer;
@MPI_SUM:MPI_Op;
@dest=0,rank of the process obtaining the result.
*/ 中间改成这个

MPI_Reduce(&local_inte, &total_inte, 1, MPI_DOUBLE, MPI_SUM, 0, MPI_COMM_WORLD);
MPI_Group https://www.rookiehpc.com/mpi/docs/mpi_group.php
并行IO文件
1997年推出了MPI的最新版本MPI-2
MPI-2加入了许多新特性,主要包括 * 动态进程(Dynamic Process) * 远程存储访问(Remote Memory Access) * 并行I/O访问(Parallel I/O Access) * MPI-1没有对并行文件I/O给出任何定义,原因在于并行I/O过于复杂,很难找到一个统一的标准。 more
数据发送和收集
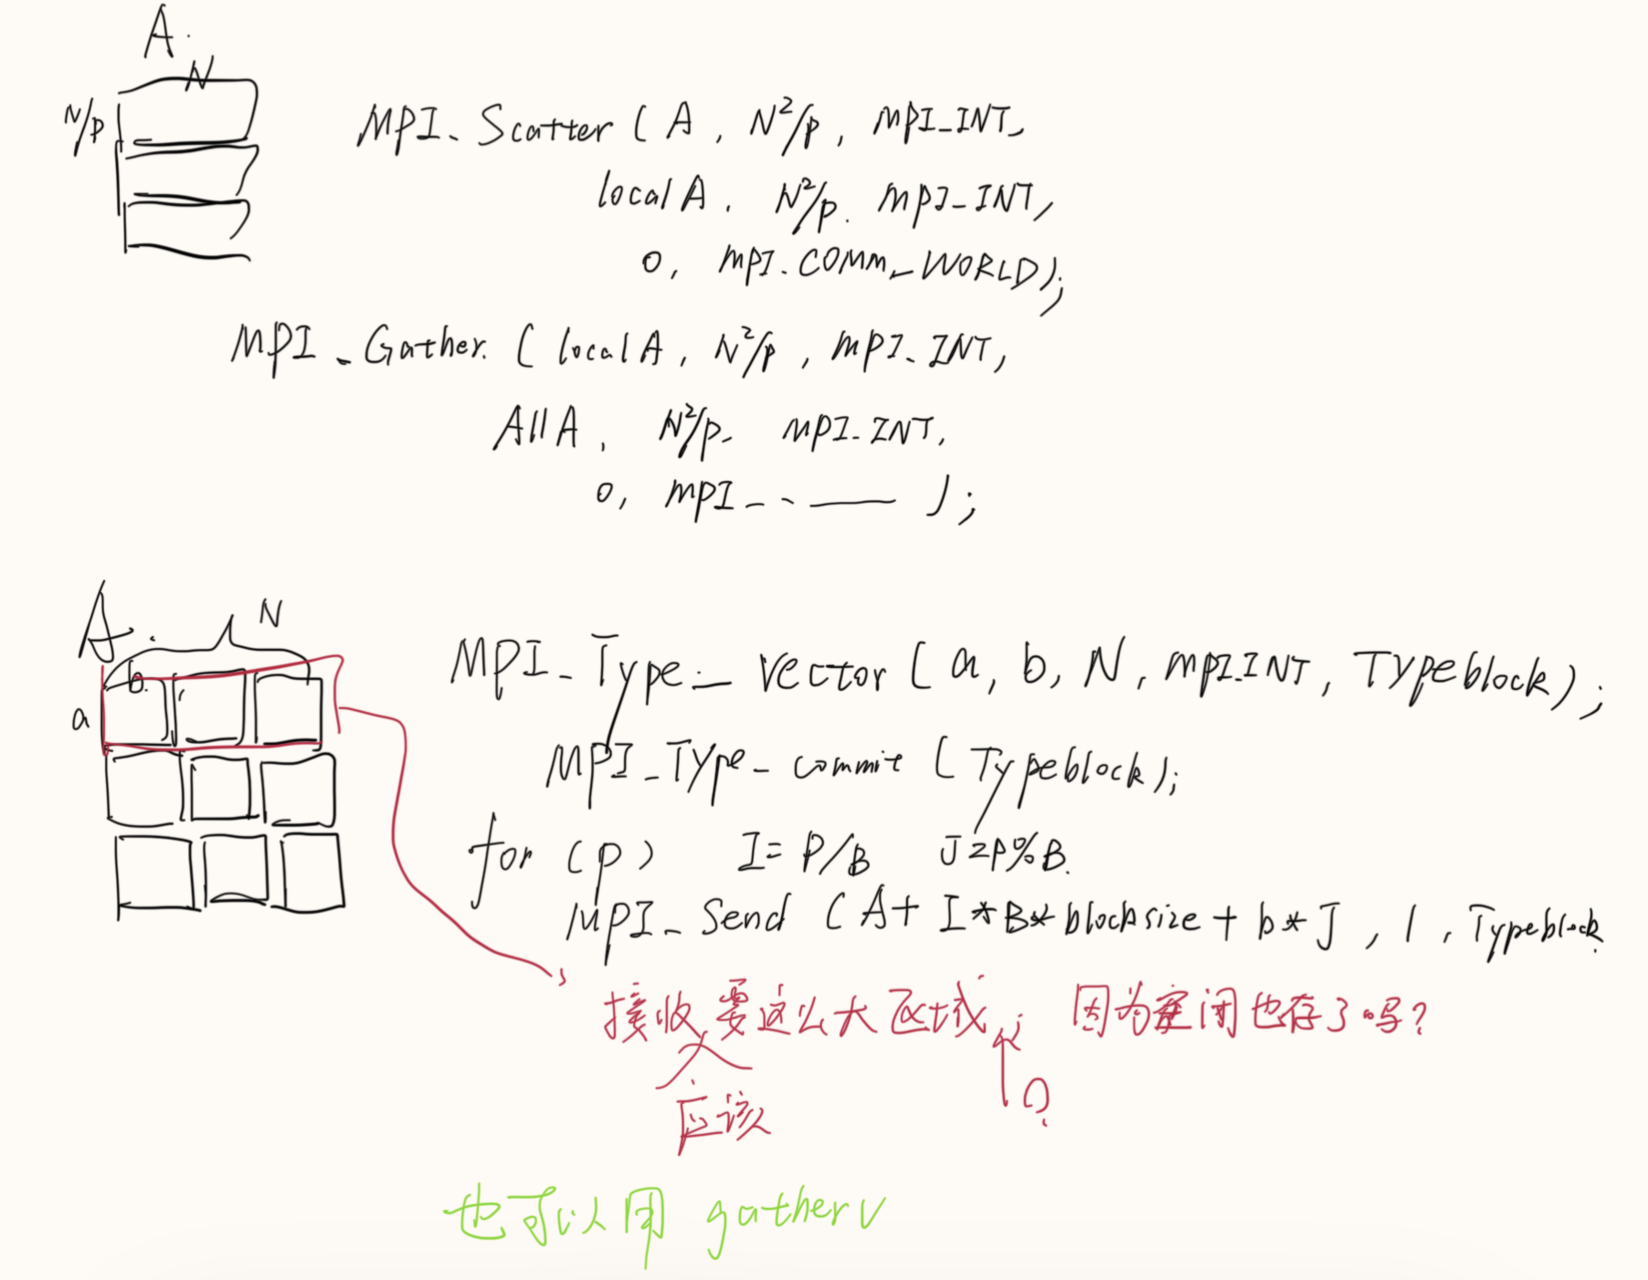
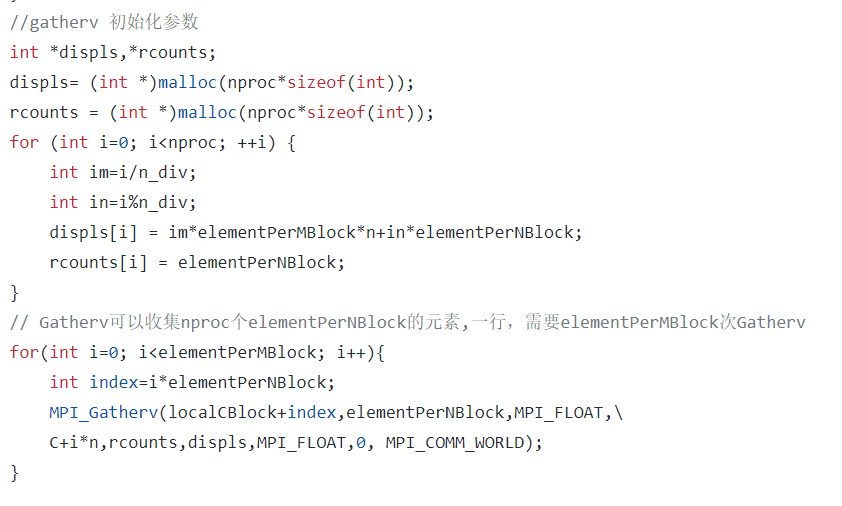
https://blog.csdn.net/susan_wang1/article/details/50033823
https://blog.csdn.net/u012417189/article/details/25798705
是否死锁: https://stackoverflow.com/questions/20448283/deadlock-with-mpi
https://mpitutorial.com/tutorials/
http://staff.ustc.edu.cn/~qlzheng/pp11/ 第5讲写得特别详细
https://www.mpich.org/static/docs/latest/www3/
简介
C 盘没空间了,啊啊啊~
It's a fucking crazy thing when you reuse a Bluetooth device, because forget how to make pair.
My keyboard encounter Poor contact of keyboard keys, esepeacially the ctrl
iOS fn + i
Mac OS X fn + o
Windows fn + p
Read more: official ref and ref_photo
It seems that just
you can Turn on the Bluetooth.
连接蓝牙方法:(我们键盘没有送蓝牙适配器)需要您电脑有蓝牙功能,
Windows weird option 输入 FC980MBT 的PIN,也可以选择关闭,尤其是鼠标也需要输入时:
00000 using original keyboard,click confirm.00000 using new keyboard, enter.暂无
暂无
上面回答部分来自ChatGPT-3.5,没有进行正确性的交叉校验。
无
导言
常见的排行榜,国内外的GPT-like工具。