- 从底层的优化做起,自底向上的。对整个AI训练的难点有个全面细致的认知。
- 或者从应用的问题出发建模,从上到下有个全面的认知。
- 往架构师的方向努力
淡而不厌,简而文,温而理,知远之近,知风之自,知微之显,可与人德矣。
华为实习部门的都是手握A会的博士大佬。本人望尘莫及,我会狠狠吸收的。
- 如何识别伪装信息 和被包装的工作
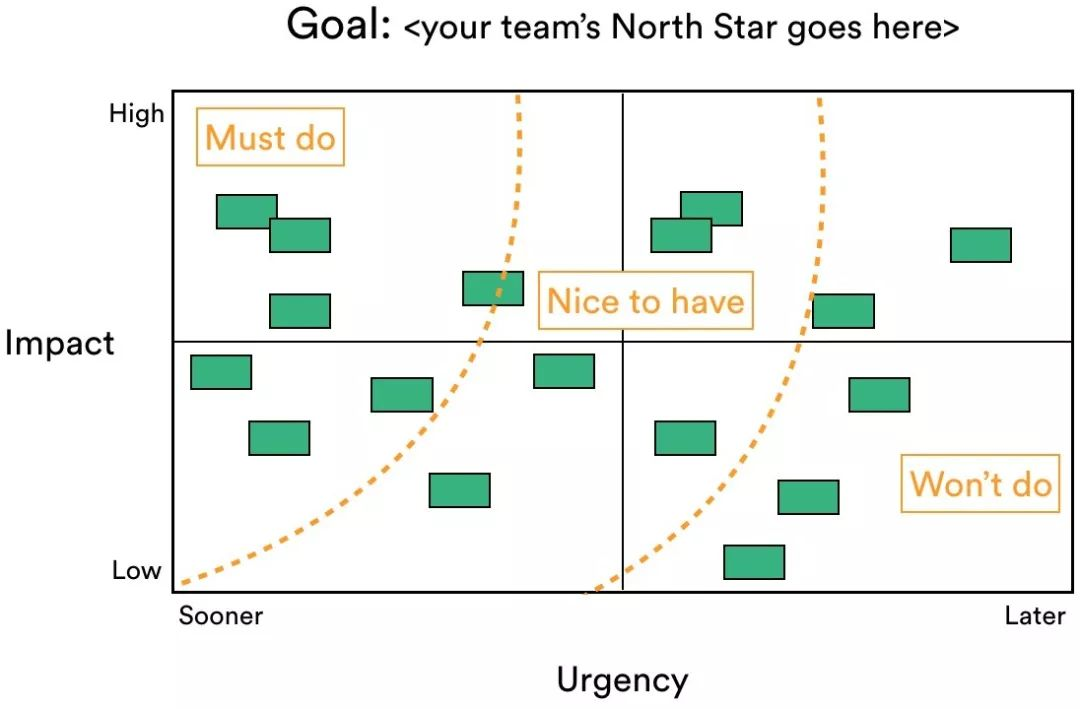
- 明确理论目标上限,当前的差距,实现路径
- 跨领域知识:公众号,订阅
- follow前沿论文:follow学者, 公众号,
- 实际问题、需求的发现
- 技术论证:理论上限,可行方案
- 独立任务分割
- 高效实现(解决问题)
- 自顶向下的设计规划、工作全局观 (从目标、需求、愿景出发。不断细化实现点)
- 顶:论文全流程思路图(构思与其余工作的对比):当前实现和问题、兼顾创新性的方法 和 设计目标期望效果。
- 中:代码实现逻辑框架图
- 底:代码语言具体实现:高内聚低耦合的重要性,解耦,拆分,这样就容易重构了。独立的微服务
- 自底向上的知识积累 与研究方法提出
- 底:领域的基础知识
- 中:领域的主流方法和解决方案
- 顶:行业痛点和有待补完的领域空白。
- 当两者相联,目标才能顺利的达成,
- 学习的优先级:用20%时间先掌握80%的基础知识或者感兴趣的关键
- 难的问题可以讨论合作得出
- 提问式主动学习:不是被动学习,尝试通过提问、讨论、教授他人等方式来加深理解和巩固所学内容。
- 合作学习: 不仅能头脑风暴idea。对概念的理解,表达能力,心理健康有好处
- 交叉与分割学习: 概念文字、视频和案例分析交叉理解。长时间执行单一学习会枯燥,效率降低。切换学习一些新鲜东西:每日关注LLM的有趣实现。
- 理论实践交融:实际运行或者编写测试代码运行来深入理解
- 持续反馈与评估:每天每周对学习的进度和效果进行分析、来调整学习计划和研究方向。可以遵循STAR 法则。
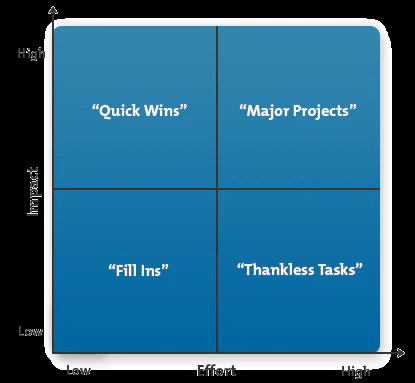
体系结构量化分析方法,重点就在于量化分析开销,比较然后进行tradeoff。当前前提是你要有基本的相关概念。
具体知识来源的优先级,或者说如何使用搜索引擎:
- 明白原理,设计实验,实际机器测量
- 认知概念,理解 (图解 >> 列表对比 >> 文字list >> 大段描述)
- 阅读相关的论文以及书籍
- 国内大佬的博客和大论文
- 国外论坛Stack Overflow > 国内知乎 > 博客园 > csdn > 其他
- 资料的来源(论文 >> 官方文档 >> 英文博客 >> 高质量中文资料)
在理解概念,量化了具体场景的数值后,就可以开心进行tradeoff了。
- 思维导图、摘要,来理清概念 和思路
- 结合PPT 数据与图表展示效果
注意项目的可读性和可拓展性一般与性能是不兼容的。这取决于项目的checkpoint/middleValue的保存,在性能优化时往往会消除中间变量。这样会导致代码的可读性和可拓展性下降。
- 合理的检查点,既是阶段性的成果,又能在此衍生出无限的可能
- 需要能高效的复现与重构
困难的定义可以基于以下几个要素进行评估:
- 个人技能能力:困难的程度可以取决于个人所具备的技能和能力水平。对于一个人来说,某项任务可能很容易,而对另一个人来说可能很困难,这取决于他们的专业知识、经验和技能。如果一个人已经具备了必要的知识和技能,那么他们可能更容易应对困难任务。相反,如果缺乏必要的知识和技能,任务就会更具挑战性。
- 任务量评估:任务的规模和复杂性也是评估困难程度的重要因素。任务量的多少以及任务本身的复杂性(比如需要解决的问题、涉及的步骤等)会对困难程度产生影响。
- 多人合作:效率会由于沟通同步而减半
- 量化分析加深理解:对于某些任务,特别是涉及复杂问题解决或决策制定的情况,进行量化分析可以加深对问题本质的理解。这种理解的深度也会对困难程度产生影响,因为解决关键核心会对整个任务的理解的评估进行重大修正。
- 对未知领域的任务量评估,会随着了解而变得准确。(这不是产品经理的工作吗?
- 时间的紧迫程度:完成任务所要求的时间紧迫程度也是评估困难程度的因素之一。如果任务需要在很短的时间内完成,那么它可能会被认为是更具挑战性和困难的。
上面回答部分来自ChatGPT-3.5,没有进行正确性的交叉校验。
无