- 当你想要拷贝range的元素时,使用
for(auto x : range).
- 当你想要修改range的元素时,使用
for(auto && x : range)
- 当你想要只读range的元素时,使用
for(const auto & x : range).
使用begin end
vector<int>& nums1
unordered_set<int> nums_set(nums1.begin(), nums1.end());

unordered_set<int> result;
return vector<int>(result.begin(), result.end());
以下是整理和改正后的迭代器笔记。
- 定义:随机访问迭代器是一种迭代器类型,允许在常数时间内访问序列中的任何元素,并支持灵活的迭代器操作。
-
运算支持:
- 支持指针算术运算,如
+ 和 - 运算符,允许轻松地在迭代器位置上进行移动。
- 支持下标运算符
[],使其用法与指针类似。
- 例如,对于一个指向数组的随机访问迭代器
it,可以通过 *(it + i) 或 it[i] 语法访问第 i 个元素。
-
使用场景:
- STL 容器:
vector 和 deque 都提供随机访问迭代器。
- 算法:一些标准库算法(例如
std::sort、std::nth_element)要求输入的迭代器必须是随机访问迭代器,以便快速定位和排序。
迭代器之间的减法是被允许的,两个迭代器相减返回是它们之间的距离,这个距离是一个符号类整型(signed),意味着两个迭代器之间相减可能是正数、零或者负数。
C++ 提供了 rbegin() 和 rend() 来支持容器的反向遍历:
rbegin() 返回一个反向迭代器,指向容器的最后一个元素。rend() 返回一个反向迭代器,指向容器反向遍历时的“结束位置”,即第一个元素之前的一个位置。- 在循环中,注意使用
++it 而非 --it,因为反向迭代器的递增操作相当于在正向迭代器上进行递减操作。
for (auto it = collection.rbegin(); it != collection.rend(); ++it) {
    std::cout << *it << std::endl;
    // 或者如果是键值对容器:
    // std::cout << it->first << ", " << it->second << std::endl;
}
如果非要使用 end() 和 begin()
可以这样写:
auto it = showedPositive.end();
while (it != showedPositive.begin()) {
    --it;  // 注意:先递减迭代器,再访问元素
    std::cout << *it << std::endl;
}
std::prev 函数接受两个参数:一个是指向迭代器的参数,另一个是整数偏移量。它返回从指定迭代器开始向前移动指定偏移量后的迭代器。std::next 函数接受两个参数:一个是指向迭代器的参数,另一个是整数偏移量。它返回从指定迭代器开始向后移动指定偏移量后的迭代器。
auto prevIt = std::prev(it);

auto next2It = std::next(it, 2);

auto it2 = it;
advance(it2,k);
advance
std::advance 形似index的随机访问,函数的实现方式取决于迭代器的类型:
- 对于随机访问迭代器(后面解释),它会直接使用
+= 运算符来实现移动。
- 对于双向迭代器和输入迭代器,它会使用循环来实现移动。
- 例如,以下是
std::advance 的一个简单实现, 这个实现使用了 C++17 的 if constexpr 特性,以便在编译时选择不同的实现方式。:
template <typename InputIt, typename Distance>
void advance(InputIt& it, Distance n) {
    if constexpr (std::is_same_v<std::random_access_iterator_tag,
                typename std::iterator_traits<InputIt>::iterator_category>) {
        it += n; //如果迭代器是随机访问迭代器(后面解释),它会使用 += 运算符来移动;
    } else {
        if (n >= 0) {
            while (n--) {
                ++it; //否则,它会使用循环来移动。
            }
        } else {
            while (n++) {
                --it;
            }
        }
    }
}
bitset类型存储二进制数位。
std::bitset<16> foo;
std::bitset<16> bar (0xfa2);
std::bitset<16> baz (std::string("0101111001"));

//foo: 0000000000000000
//bar: 0000111110100010
//baz: 0000000101111001
将数转化为其二进制的字符串表示
int i = 3;
string bin = bitset<16>(i).to_string(); //bin = "0000000000000011"
bin = bin.substr(bin.find('1'));        //bin = "11"
#include <utility>
pair<T1, T2> p1;            //创建一个空的pair对象(使用默认构造),它的两个元素分别是T1和T2类型,采用值初始化。
pair<T1, T2> p1(v1, v2);    //创建一个pair对象,它的两个元素分别是T1和T2类型,其中first成员初始化为v1,second成员初始化为v2。
make_pair(v1, v2);          // 以v1和v2的值创建一个新的pair对象,其元素类型分别是v1和v2的类型。
p1 < p2;                    // 两个pair对象间的小于运算,其定义遵循字典次序:如 p1.first < p2.first 或者 !(p2.first < p1.first) && (p1.second < p2.second) 则返回true。
p1 == p2;                  // 如果两个对象的first和second依次相等,则这两个对象相等;该运算使用元素的==操作符。
p1.first;                   // 返回对象p1中名为first的公有数据成员
p1.second;                 // 返回对象p1中名为second的公有数据成员
#include <tuple> // 包含 tuple

std::tuple<int, std::string, double> t1(1, "one", 1.0);

// 使用 make_tuple 函数
auto t2 = std::make_tuple(2, "two", 2.5);

//使用 tuple 时,访问/修改元素使用 std::get<index>。
std::cout << "Tuple t2: ("
            << std::get<0>(t2) << ", "
            << std::get<1>(t2) << ", "
            << std::get<2>(t2) << ")"
            << std::endl;
string vowel = "AEIOUaeiou";
if vowel.find(c) != std::string::npos;

voewl[0] = 'A';
std::string s0 ("Initial string");

// constructors used in the same order as described above:
std::string s1;
std::string s2 (s0);
std::string s3 (s0, 8, 3);
std::string s4 ("A character sequence");
std::string s5 ("Another character sequence", 12);
std::string s6a (10, 'x');
std::string s6b (10, 42);      // 42 is the ASCII code for '*'
std::string s7 (s0.begin(), s0.begin()+7);

std::cout << "s1: " << s1 << "\ns2: " << s2 << "\ns3: " << s3;
std::cout << "\ns4: " << s4 << "\ns5: " << s5 << "\ns6a: " << s6a;
std::cout << "\ns6b: " << s6b << "\ns7: " << s7 << '\n';

//output
s1:
s2: Initial string
s3: str
s4: A character sequence
s5: Another char
s6a: xxxxxxxxxx
s6b: **********
s7: Initial
读取空格分割的
stringstream txt(s);
string word;
while(txt>>word){
    // to do
}
插入
使用insert()在指向位置的右边插入
// inserting into a string
#include <iostream>
#include <string>

std::string str="to be question";
std::string str2="the ";
std::string str3="or not to be";
std::string::iterator it;

// used in the same order as described above:
str.insert(6,str2);                 // to be (the )question
str.insert(10,"to be ");            // to be not (to be )that is the question
it = str.insert(str.begin()+5,','); // to be(,) not to be: that is the question
str.insert(6,str3,3,4);             // to be (not )the question
str.insert(10,"that is cool",8);    // to be not (that is )the question
str.insert(str.end(),3,'.');       // to be, not to be: that is the question(...)
str.insert(15,1,':');               // to be not to be(:) that is the question
// ???
str.insert (it+2,str3.begin(),str3.begin()+3); // (or )
尾部插入
插入char不同的方法
std::string s = "C+";
char ch = '+';

s.push_back(ch);
s += ch; //string::operator+=, which is overloaded for chars and internally calls to the push_back() function.
s.append(1, ch); //1*ch个字符
s.append("abcd"); //后面添加abcd字符串

std::stringstream ss;
ss << s << ch;
ss >> s;

s.insert(s.length(), 1, ch);
连接
//连接 string, 很简单。
str1 = str1 + str2;
//连接 char * , src 和 dest 所指内存区域不可以重叠且 dest 必须有足够的空间来容纳 src 的字符串。结果返回指向 dest 的指针。
#include <cstring>
strcat(dest, src);
复制
str3 = str1;
string erase
三种情况
// string::erase
#include <iostream>
#include <string>

int main ()
{
std::string str ("This is an example sentence.");
std::string str1(str) ;
std::cout << str << '\n';
                                        // "This is an example sentence."
str.erase (10,8);                        //            ^^^^^^^^
//去除index=10的连续8个元素,

//去除从index=3开始的所有元素, 后面全删除
str1.erase (3);
// "Thi"

std::cout << str << '\n';
                                        // "This is an sentence."
str.erase (str.begin()+9);               //           ^
//去除itr指向的元素
std::cout << str << '\n';
                                        // "This is a sentence."
str.erase (str.begin()+5, str.end()-9);  //       ^^^^^
//去除[first,last).的元素
std::cout << str << '\n';
                                        // "This sentence."
return 0;
}
删除最后一个元素
std::string s = "C,C++,Java,";
if (!s.empty()) {
s.pop_back();
}

if (!s.empty()) {
s.resize(s.size() - 1);
}

if (!s.empty()) {
s.erase(std::prev(s.end()));
}

if (!s.empty()) {
s.erase(s.size() - 1);
}
截取
// Copy three characters of s1 (starting
// from position 1)
//第一个参数是要截取的字符串,第二个参数是截取的开始位置,第三个参数是截取长度(可选)1。如果没有指定长度,则子字符串将延续到源字符串的结尾。
string r = s1.substr(1, 3);
// Take any string
string s = "dog:cat";
// Find position of ':' using find()
int pos = s.find(":");
// Copy substring after pos(include pos)
string sub = s.substr(pos);
// Copy substring before pos(not include pos)
string sub = s.substr(0 , pos);
反转string
reverse(greeting.begin(),greeting.end());
长度
//总长度
len = str3.size();
// strlen 大部分情况结果和size一样,但是字符串里有\0, strlen会提前返回。
len = strlen(s1);
遍历
string s;
for(auto && x : s)
打印
printf("%s", your_string.c_str()); //不推荐
cout << your_string;
查找子元素位置
// log1 中找空格
int pos1 = log1.find_first_of(" ");

// 判断是否找到
if(s.find(goal) != string::npos){
}
npos是一个常数,表示size_t的最大值(Maximum value for size_t)。许多容器都提供这个东西,用来表示不存在的位置,类型一般是std::container_type::size_type。
判断数字
isdigit 是 C 标准库中的函数,用于检查一个字符是否为数字字符。它定义在 头文件中(在 C++ 中)或者 头文件中(在 C 中)。
#include <cctype>  // 对应 isdigit 函数
// 判断数字
bool isDigit1 = isdigit(log1[pos1 + 1]);
判断前缀
要检查一个 std::string 是否以某个前缀开头,std::string 没有直接提供“检查前缀”的方法,但可以使用 compare 或 find 方法实现。
方法 1:使用 compare 检查前缀
std::string::compare 可以比较字符串的部分内容,适合用于前缀检查。
#include <iostream>
#include <string>

bool hasPrefix(const std::string& str, const std::string& prefix) {
    return str.compare(0, prefix.size(), prefix) == 0;
}

int main() {
    std::string text = "Hello, world!";
    std::string prefix = "Hello";

    if (hasPrefix(text, prefix)) {
        std::cout << "The string starts with the prefix." << std::endl;
    } else {
        std::cout << "The string does not start with the prefix." << std::endl;
    }

    return 0;
}
方法 2:使用 find 检查前缀
可以使用 std::string::find,但需要确认找到的位置是否是 0 才能确定是前缀。
#include <iostream>
#include <string>

bool hasPrefix(const std::string& str, const std::string& prefix) {
    return str.find(prefix) == 0;
}

int main() {
    std::string text = "Hello, world!";
    std::string prefix = "Hello";

    if (hasPrefix(text, prefix)) {
        std::cout << "The string starts with the prefix." << std::endl;
    } else {
        std::cout << "The string does not start with the prefix." << std::endl;
    }

    return 0;
}
方法 3:使用 std::string::starts_with (C++20)
如果你使用的是 C++20 或更高版本,可以直接使用 starts_with 方法。
#include <iostream>
#include <string>

int main() {
    std::string text = "Hello, world!";
    std::string prefix = "Hello";

    if (text.starts_with(prefix)) {
        std::cout << "The string starts with the prefix." << std::endl;
    } else {
        std::cout << "The string does not start with the prefix." << std::endl;
    }

    return 0;
}
总结
- 如果使用 C++20,可以直接用
starts_with。
- 否则可以用
compare 或 find,推荐 compare,因为它可以直接比较前缀而不需要判断位置。
查找最后出现的
std::string::rfind 是 C++ 标准库提供的一个方法,用于从字符串的末尾向前查找指定的子字符串或字符。它的功能与 find 类似,但查找方向是从右向左,适用于需要从字符串末尾开始定位子字符串的情况。
函数原型
size_t rfind(const std::string& str, size_t pos = std::string::npos) const;
size_t rfind(const char* s, size_t pos = std::string::npos) const;
size_t rfind(char c, size_t pos = std::string::npos) const;
参数说明
- str:要查找的子字符串。
- s:C 风格字符串(
const char*)。
- c:要查找的单个字符。
- pos:从字符串的
pos 位置向前查找,默认值为 std::string::npos,表示从末尾开始查找。
返回值
- 返回找到的子字符串或字符的起始位置索引。
- 如果没有找到,返回
std::string::npos。
使用示例
- 查找最后出现的子字符串:
#include <iostream>
#include <string>

int main() {
    std::string text = "Hello, world! Hello, C++!";
    size_t pos = text.rfind("Hello");

    if (pos != std::string::npos) {
        std::cout << "'Hello' found at position: " << pos << std::endl;
    } else {
        std::cout << "'Hello' not found." << std::endl;
    }

    return 0;
}
输出:
'Hello' found at position: 14
- 查找最后出现的字符:
#include <iostream>
#include <string>

int main() {
    std::string text = "abcdefgabc";
    size_t pos = text.rfind('a');

    if (pos != std::string::npos) {
        std::cout << "'a' found at position: " << pos << std::endl;
    } else {
        std::cout << "'a' not found." << std::endl;
    }

    return 0;
}
输出:
- 指定位置查找:
如果想要从特定位置向前查找,可以指定 pos 参数。例如,从索引 10 向前查找字符 'o':
#include <iostream>
#include <string>

int main() {
    std::string text = "Hello, world! Hello, C++!";
    size_t pos = text.rfind('o', 10);

    if (pos != std::string::npos) {
        std::cout << "'o' found at position: " << pos << std::endl;
    } else {
        std::cout << "'o' not found." << std::endl;
    }

    return 0;
}
输出:
在这些示例中,rfind 帮助我们从右向左查找字符串或字符,适用于查找最后一次出现的位置或从右边指定位置向左查找的需求。
regex 读取字符串元素, eg undo xxx aaa 4 to 10
在 C++ 中,可以使用 std::regex、std::stringstream 或 std::find_if 等方法对字符串进行解析和分割。以下提供一种基于 std::regex 的方法来提取单个数字和范围(如 4 to 10)。
#include <vector>
#include <regex> //important

// 解析字符串中的所有单个数字和范围
void parseNumbers(const std::string& input, std::vector<std::pair<int, int>>& ranges) {
    // 在 C++ 中,使用 R"(...)" 定义原始字符串,可以避免转义字符
    std::regex rangePattern(R"(\b(\d+)\s+to\s+(\d+)\b)");  // 匹配范围形式

    std::smatch match;
    std::string::const_iterator searchStart(input.cbegin());

    // 找到所有的范围
    while (std::regex_search(searchStart, input.cend(), match, rangePattern)) {
        int start = std::stoi(match[1]);
        int end = std::stoi(match[2]);
        ranges.emplace_back(start, end);
        searchStart = match.suffix().first;  // 更新搜索起点
    }


}

int main() {
    std::string input = "undo xxx aaa 1 2 4 to 10";
    std::vector<std::pair<int, int>> ranges;

    parseNumbers(input, ranges);


    // 输出范围

    return 0;
}
关联容器和顺序容器有着根本的不同:关联容器中的元素是按关键字来保存和访问的。与之相对,顺序容器中的元素是按它们在容器中的位置来顺序保存和访问的。
为何map和set的插入删除效率比用其他序列容器高?
因为对于关联容器来说,不需要做内存拷贝和内存移动。说对了,确实如此。map和set容器内所有元素都是以节点的方式来存储,其节点结构和链表差不多,指向父节点和子节点。
插入的时候只需要稍做变换,把节点的指针指向新的节点就可以了。删除的时候类似,稍做变换后把指向删除节点的指针指向其他节点就OK了。这里的一切操作就是指针换来换去,和内存移动没有关系。
链表,或者数组(如果父节点的数组下标是 i,那么它的左孩子就是 i * 2 + 1,右孩子就是 i * 2 + 2。)
链式结构如下,注意左右孩子节点
struct TreeNode {
    int val;
    TreeNode *left;
    TreeNode *right;
    TreeNode(int x) : val(x), left(NULL), right(NULL) {}
};

TreeNode* a = new TreeNode();
a->val = 9;
a->left = NULL;
a->right = NULL;
深度遍历: 前/中/后序遍历。
注意:这里前中后,其实指的就是中间节点/根节点的遍历顺序
堆(Heap)是计算机科学中一类特殊的数据结构的统称。
堆通常是一个可以被看做一棵完全二叉树的数组对象。
堆满足下列性质:
#include <algorithm>
int myints[] = {10,20,30,5,15};
vector<int> v(myints,myints+5);
vector<int>::iterator it;

make_heap (v.begin(),v.end());//male_heap就是构造一棵树,使得每个父结点均大于等于其子女结点
cout << "initial max heap   : " << v.front() << endl;

pop_heap (v.begin(),v.end());//pop_heap不是删除某个元素而是把第一个和最后一个元素对调后[first,end-1]进行构树,最后一个不进行构树
v.pop_back();//删除最后一个的结点
cout << "max heap after pop : " << v.front() << endl;

v.push_back(99);//在最后增加一个结点
push_heap (v.begin(),v.end());//重新构树
cout << "max heap after push: " << v.front() << endl;

//请在使用这个函数前,确定序列符合堆的特性,否则会报错!
sort_heap (v.begin(),v.end());//把树的结点的权值进行排序,排序后,序列将失去堆的特性
std::cout << "sorted array       : ";
for (int i = 0; i < v.size(); ++i) {
    std::cout << v[i] << ' ';
}
std::cout << std::endl;
- map
- 内部数据的组织,基于红黑树实现,红黑树具有自动排序的功能,因此map内部所有的数据,在任何时候,都是有序的。其中每个键都是唯一的,可以插入或删除,但不能更改。但是与键关联的值可以更改。
- 红黑树是一种含有红黑结点并能自平衡的二叉查找/搜索树, 别称平衡二叉B树(symmetric binary B-trees)
- unordered_map(hash_map)
- 基于哈希表,数据插入和查找的时间复杂度很低,几乎是常数时间,而代价是消耗比较多的内存。底层实现上,使用一个下标范围比较大的数组来存储元素,形成很多的桶,利用hash函数对key进行映射到不同区域进行保存。
- 标准库的unordered_map,底层实现是基于hashtable的,其避免冲突的方法是使用开链(seperate chaining)法,这种做法是在每一个表格元素中维护一个list,每个表格元素称之为buket(桶)
hash_map VS unordered_map
hash_map,unordered_map本质是一样的,只不过 unordered_map被纳入了C++标准库标准:
- 早期由于在C++标准库中没有定义散列表
hash_map,标准库的不同实现者将提供一个通常名为hash_map的非标准散列表。因为这些实现不是遵循标准编写的,所以它们在功能和性能保证上都有微妙的差别。
- 从C++11开始,哈希表实现已添加到C++标准库标准。决定对类使用备用名称
unordered_map,以防止与这些非标准实现的冲突,并防止在其代码中有hash_table的开发人员无意中使用新类。unordered_map更具描述性,因为它暗示了类的映射接口和其元素的无序性质。
map和multimap的区别
map不允许相同key值存在,multimap则允许相同的key值存在。
| 特性 |
map |
unordered_map |
| 元素排序 |
严格弱序 |
无 |
| 常见实现 |
平衡树或红黑树 |
哈希表 |
| 查找时间 |
O(log(n)) |
平均 O(1),最坏 O(n)(哈希冲突) |
| 插入时间 |
O(log(n)) + 重新平衡 |
同查找时间 |
| 删除时间 |
O(log(n)) + 重新平衡 |
同查找时间 |
| 需要比较器 |
只需 < 运算符 |
只需 == 运算符 |
| 需要哈希函数 |
不需要 |
需要 |
| 常见用例 |
当无法提供良好哈希函数或哈希 |
在大多数其他情况下。当顺序不重要时 |
|
函数太慢,或者需要有序时 |
|
std::map的优势: 内存池的自动管理
自己实现的map需要自己去new一些节点,当节点特别多, 而且进行频繁的删除和插入的时候,内存碎片就会存在,而STL采用自己的Allocator分配内存,以内存池的方式来管理这些内存,会大大减少内存碎片,从而会提升系统的整体性能。
为什么有时unordered_map, 性能比map差
注意到很多代码使用 std::unordered_map 因为“哈希表更快”。但是对于小map,具有很高的内存开销。
网上有许多map和unorderd_map的比较,但是都是大例子。
下载一个,比较N比较小时的速度。前面是插入,后面是读取时间。编译g++ -std=c++11 -O3 map.cpp -o main
map的value是int,默认为0。可以直接++
#include <map>
#include <unordered_map>
//c++11以上
map<string,int> m3 = {
    {"string",1}, {"sec",2}, {"trd",3}
};
map<string,string> m4 = {
    {"first","second"}, {"third","fourth"},
    {"fifth","sixth"}, {"begin","end"}
};
operator[]为不存在键,构造默认值
比如对于std::map<std::string, int> m; m["apple"]++;
m["apple"]++ 会首先检查 apple 是否存在于容器中。- 由于 apple 不存在,容器会插入一个默认值 0。
- 然后,++ 操作会将 0 增加到 1。
常见默认值
在 C++ 中,map 和 unordered_map 容器的默认值取决于它们存储的值类型的默认构造方式。具体来说:
- 数值类型:
- 对于整型(如
int, long 等),默认值是 0。
-
对于浮点型(如 float, double 等),默认值是 0.0。
-
指针类型:
-
指针类型的默认值是 nullptr。
-
自定义类型:
-
自定义类型的默认值是该类型默认构造函数构造的对象。如果没有显式定义默认构造函数,则编译器会提供一个默认的构造函数,通常将所有成员初始化为默认值。
-
标准库类型:
- 对于标准库类型(如
std::string),默认值是空字符串 ""。
- 对于
std::vector,默认值是一个空的 vector。
// insert 不能覆盖元素,已经存在会失败
mapStudent.insert(map<int, string>::value_type (1, "student_one"));
// 数组方式可以覆盖
mapStudent[1] = "student_one";
判断insert是否成功
用pair来获得是否insert成功,程序如下
pair<map<int, string>::iterator, bool> Insert_Pair;

Insert_Pair = mapStudent.insert(map<int, string>::value_type (1, "student_one"));
我们通过pair的第二个变量来知道是否插入成功,它的第一个变量返回的是一个map的迭代器,如果插入成功的话Insert_Pair.second应该是true的,否则为false。
mymap.erase ('c'); // erasing by key
//unordered_map 类模板中,还提供有 at() 成员方法,和使用 [ ] 运算符一样,at() 成员方法也需要根据指定的键,才能从容器中找到该键对应的值;
//不同之处在于,如果在当前容器中查找失败,该方法不会向容器中添加新的键值对([]会插入默认值),而是直接抛出out_of_range异常。
cnt.at(num)

// c++17 支持
for (auto &[num, c] : cnt) {
}
for (auto &[x, _] : cnt) {
    //sth
}
// 否则
for (auto it = cnt.begin(); it != cnt.end(); ++it) {
    auto& key = it->first;
    auto& value = it->second;
    // 使用 key 和 i 进行操作
}
查找是否存在 find, 判断一般会比count快
通过 find() 方法得到的是一个正向迭代器,有 2 种情况:
- 当 find() 方法成功找到以指定元素作为键的键值对时,其返回的迭代器就指向该键值对;
- 当 find() 方法查找失败时,其返回的迭代器和 end() 方法返回的迭代器一样,指向容器中最后一个键值对之后的位置。
unordered_map<string, string>::iterator iter = umap.find("GO教程");
if (iter == umap.end()) {
    //查找失败
    cout << "当前容器中没有以\"GO教程\"为键的键值对";
}else {
    //查找成功
    cout << iter->first << " " << iter->second << endl;
}
查找是否存在 count
- 用count函数来判定关键字是否出现,其缺点是无法定位数据出现位置。
// 检查键30是否存在
if (mp.count(30))
cout << "键30存在\n";
else
cout << "键30不存在\n";
常用于 一个值是否存在 的相关问题
- 按关键字有序:
set(关键字即值,即只保存关键字的容器);使用红黑树,自动排序,关键字唯一。multiset(关键字可重复出现的set);
- 无序集合:
unordered_set(用哈希函数组织的set);unordered_multiset(哈希组织的set,关键字可以重复出现)。
set map 的区别
map和set都是C++的关联容器,其底层实现都是红黑树(RB-Tree)。由于 map 和set所开放的各种操作接口,RB-tree 也都提供了,所以几乎所有的 map 和set的操作行为,都只是转调 RB-tree 的操作行为。
map和set区别在于:
- map中的元素是key-value(关键字—值)对:关键字起到索引的作用,值则表示与索引相关联的数据;
- Set与之相对就是关键字的简单集合,set中每个元素只包含一个关键字。
- set的迭代器是const的,不允许修改元素的值;map允许修改value,但不允许修改key
- 原因是因为map和set是根据关键字排序来保证其有序性的,如果允许修改key的话,那么首先需要删除该键,然后调节平衡,再插入修改后的键值,调节平衡,如此一来,严重破坏了map和set的结构,导致iterator失效,不知道应该指向改变前的位置,还是指向改变后的位置。
- 所以STL中将set的迭代器设置成const,不允许修改迭代器的值;而map的迭代器则不允许修改key值,允许修改value值。
- map支持下标操作,set不支持下标操作。
- map可以用key做下标,map的下标运算符
[ ]将关键码作为下标去执行查找,如果关键码不存在,则插入一个具有该关键码和mapped_type类型默认值的元素至map中,因此下标运算符[ ]在map应用中需要慎用,
- const_map不能用,只希望确定某一个关键值是否存在而不希望插入元素时也不应该使用,mapped_type类型没有默认值也不应该使用。
- 如果find能解决需要,尽可能用find。
默认红黑树,使用std::less 作为比较器, 升序序列。
| 存放数据类型 |
排序规则 |
| 整数、浮点数等 |
按从小到大的顺序排列 |
| 字符串 |
按字母表顺序排列 |
| 指针 |
按地址升序排列 |
| 指向某元素的指针 |
按指针地址递增的顺序排列 |
| 类(自定义) |
可以自定义排序规则 |
// 自定义比较器,按降序排列
struct Greater {
    bool operator()(const int& a, const int& b) const {
        return a > b;
    }
};
std::set<int, Greater> s = {5, 3, 8, 1, 4};
自定义set 排序
template < class T,                             // set::key_type/value_type
        class Compare = less<T>,        // set::key_compare/value_compare
        class Alloc = allocator<T>         // set::allocator_type
        > class set;

//初始化
set<char> vowel {'a','e','i','o','u'};

template <class T, class Compare, class Alloc>
bool operator== ( const set<T,Compare,Alloc>& lhs,
                    const set<T,Compare,Alloc>& rhs ); // 和map类似的,重载相等判断
自定义hash函数
auto hash_p = [](const pair<int, int> &p) -> size_t {
static hash<long long> hash_ll;
return hash_ll(p.first + (static_cast<long long>(p.second) << 32));
};
unordered_set<pair<int, int>, decltype(hash_p)> points(0, hash_p); //(0,hash_p)分别为迭代器的开始和结束的标记(数组多为数据源)
//多用于数组 set<int> iset(arr,arr+sizeof(arr)/sizeof(*arr));
类似的例子
auto hash = [](const std::pair<int, int>& p){ return p.first * 31 + p.second; };
std::unordered_set<std::pair<int, int>, decltype(hash)> u_edge_(8, hash);
上面的不是用lambda expression隐函数,而是定义函数的写法
struct pair_hash {
    inline std::size_t operator()(const std::pair<int,int> & v) const {
        return v.first*31+v.second;
    }
};
std::unordered_set< std::pair<int, int>,  pair_hash> u_edge_;
//增改
insert()–在集合中插入元素
emplace() 最大的作用是避免产生不必要的临时变量

erase()–删除集合中的元素
//删除 set 容器中值为 val 的元素
//第 1 种格式的 erase() 方法,其返回值为一个整数,表示成功删除的元素个数;
size_type erase (const value_type& val);
//删除 position 迭代器指向的元素
//后 2 种格式的 erase() 方法,返回值都是迭代器,其指向的是 set 容器中删除元素之后的第一个元素。
iterator  erase (const_iterator position);
//删除 [first,last) 区间内的所有元素
iterator  erase (const_iterator first, const_iterator last);
clear()–删除集合中所有元素

//查询
find()–返回一个指向被查找到元素的迭代器。返回值:该函数返回一个迭代器,该迭代器指向在集合容器中搜索的元素。如果找不到该元素,则迭代器将指向集合中最后一个元素之后的位置end
count()- 查找的bool结果
size()–集合中元素的数目

swap()–交换两个集合变量
- 并查集主要用于处理一些不相交集合的合并和查询问题。它在很多算法问题中都有广泛的应用,特别是在图论和动态连通性问题中。
并查集的基本操作
- 初始化
UnionFind(int n):每个元素初始化为自己的父节点。
- 查找
int find(int x):查找某个元素的根节点,并进行路径压缩以优化后续查找。
- 合并
int find(int x):将两个元素所在的集合合并为一个集合。
核心是
- 同一个并查集内的元素会指向同一个parent
- 维护并查集深度Rank,来按秩合并。
- 数据结构用数组和map都行
vector 实现并查集,包括路径压缩和按秩合并
#include <iostream>
#include <vector>
using namespace std;

class UnionFind {
public:
    vector<int> parent;
    vector<int> rank;

    UnionFind(int n) {
        parent.resize(n);
        rank.resize(n, 0);
        for (int i = 0; i < n; ++i) {
            parent[i] = i;
        }
    }

    int find(int x) {
        if (parent[x] != x) {
            parent[x] = find(parent[x]); // 路径压缩
        }
        return parent[x];
    }

    void unite(int x, int y) {
        int rootX = find(x);
        int rootY = find(y);
        if (rootX != rootY) {
            if (rank[rootX] < rank[rootY]) {
                parent[rootX] = rootY;
            } else if (rank[rootX] > rank[rootY]) {
                parent[rootY] = rootX;
            } else {
                parent[rootY] = rootX;
                rank[rootX]++;
            }
        }
    }

    bool connected(int x, int y) {
        return find(x) == find(y);
    }
};

int main() {
    int n = 5;
    UnionFind uf(n);

    uf.unite(0, 1);
    uf.unite(1, 2);
    uf.unite(3, 4);

    cout << "Is 0 and 2 connected? " << (uf.connected(0, 2) ? "Yes" : "No") << endl; // Yes
    cout << "Is 0 and 3 connected? " << (uf.connected(0, 3) ? "Yes" : "No") << endl; // No

    return 0;
}
map 实现并查集,处理元素不连续或者数量不定情况
#include <iostream>
#include <map>
using namespace std;

class UnionFind {
public:
    map<int, int> parent;
    map<int, int> rank;

    // 初始化
    void makeSet(int x) {
        parent[x] = x;
        rank[x] = 0;
    }

    // 查找根节点,并进行路径压缩
    int find(int x) {
        if (parent.find(x) == parent.end()) {
            makeSet(x); // 如果 x 不存在,先初始化
        }
        if (parent[x] != x) {
            parent[x] = find(parent[x]); // 路径压缩
        }
        return parent[x];
    }

    // 合并两个集合
    void unite(int x, int y) {
        int rootX = find(x);
        int rootY = find(y);
        if (rootX != rootY) {
            if (rank[rootX] < rank[rootY]) {
                parent[rootX] = rootY;
            } else if (rank[rootX] > rank[rootY]) {
                parent[rootY] = rootX;
            } else {
                parent[rootY] = rootX;
                rank[rootX]++;
            }
        }
    }

    // 判断两个元素是否在同一个集合中
    bool connected(int x, int y) {
        return find(x) == find(y);
    }
};

int main() {
    UnionFind uf;

    // 初始化一些元素
    uf.makeSet(1);
    uf.makeSet(2);
    uf.makeSet(3);
    uf.makeSet(4);
    uf.makeSet(5);

    // 合并一些集合
    uf.unite(1, 2);
    uf.unite(2, 3);
    uf.unite(4, 5);

    // 查询
    cout << "Is 1 and 3 connected? " << (uf.connected(1, 3) ? "Yes" : "No") << endl; // Yes
    cout << "Is 1 and 4 connected? " << (uf.connected(1, 4) ? "Yes" : "No") << endl; // No

    // 动态添加新元素并合并
    uf.unite(6, 7);
    cout << "Is 6 and 7 connected? " << (uf.connected(6, 7) ? "Yes" : "No") << endl; // Yes

    return 0;
}
C++ 中的容器适配器 stack、queue 和 priority_queue 依赖不同的基础容器来实现特定的数据结构行为。每种容器适配器都有特定的成员函数要求,默认选择的基础容器是为了更好地满足这些要求。
| 容器适配器 |
基础容器筛选条件 |
默认使用的基础容器 |
| stack |
基础容器需包含以下成员函数: |
deque |
|
- empty() |
|
|
- size() |
|
|
- back() |
|
|
- push_back() |
|
|
- pop_back() |
|
|
满足条件的基础容器有 vector、deque、list。 |
|
| queue |
基础容器需包含以下成员函数: |
deque |
|
- empty() |
|
|
- size() |
|
|
- front() |
|
|
- back() |
|
|
- push_back() |
|
|
- pop_front() |
|
|
满足条件的基础容器有 deque、list。 |
|
| priority_queue |
基础容器需包含以下成员函数: |
vector |
|
- empty() |
|
|
- size() |
|
|
- front() |
|
|
- push_back() |
|
|
- pop_back() |
|
|
满足条件的基础容器有 vector、deque。 |
|
堆栈,先进先出
stack<int> minStack;
minStack = stack<int>();

// 支持初始化,但是注意将整个数组元素推入堆栈,堆栈的顶部元素top将是数组的第一个元素。
std::vector<int> elements = {1, 2, 3, 4, 5};
std::stack<int> myStack(elements.begin(), elements.end());

//增
s.push(x);  // 复制 x 到栈中
std::stack<std::pair<int, int>> s;
s.emplace(1, 2);  // 在栈中直接构造 std::pair<int, int> (1, 2)

//删
minStack.pop(); //该函数仅用于从堆栈中删除元素,并且没有返回值。因此,我们可以说该函数的返回类型为void。

//改

//查
!minStack.empty()
top_value = minStack.top();
stIn.size() //该函数返回堆栈容器的大小,该大小是堆栈中存储的元素数量的度量。
emplace VS push
push() adds a copy of an already constructed object into the queue as a parameter.
emplace() constructs a new object in-place at the end of the queue.
If your usage pattern is one where you create a new object and add it to the container, you shortcut a few steps(creation of a temporary object and copying it) by using emplace().
注意pop仅用于从堆栈中删除元素,并且没有返回值, 一般用法如下
top_value = stIn.top();
stIn.pop();
清空
stack不支持clear, 除开一个个pop
std::stack<int> myStack;
// 添加元素到 myStack

myStack = std::stack<int>(); // 清空 myStack, 丢弃原有对象

std::stack<int> emptyStack;
myStack.swap(emptyStack); // 清空 myStack
- 队列中的数据元素遵循“先进先出”(First In First Out)的原则,简称FIFO结构;
- 在队尾添加元素,在队头删除元素。
#include <queue>

// 初始化
queue<int> q;

// 相对于stack的操作, 没有top(), 但新增
q.front()               返回队首元素的值,但不删除该元素
q.back()                返回队列尾元素的值,但不删除该元素
清空
直接用空的队列对象赋值
queue<int> q1;
// process
// ...
q1 = queue<int>();
使用swap,这种是最高效的,定义clear,保持STL容器的标准。
void clear(queue<int>& q) {
    queue<int> empty;
    swap(empty, q);
}
队列保存pair
queue<pair<int, int>> gq;
gq.push({ 10, 20 });

pair<int, int> p;
int x,y;
p = gq.front();
x = p.first;
y = p.second;
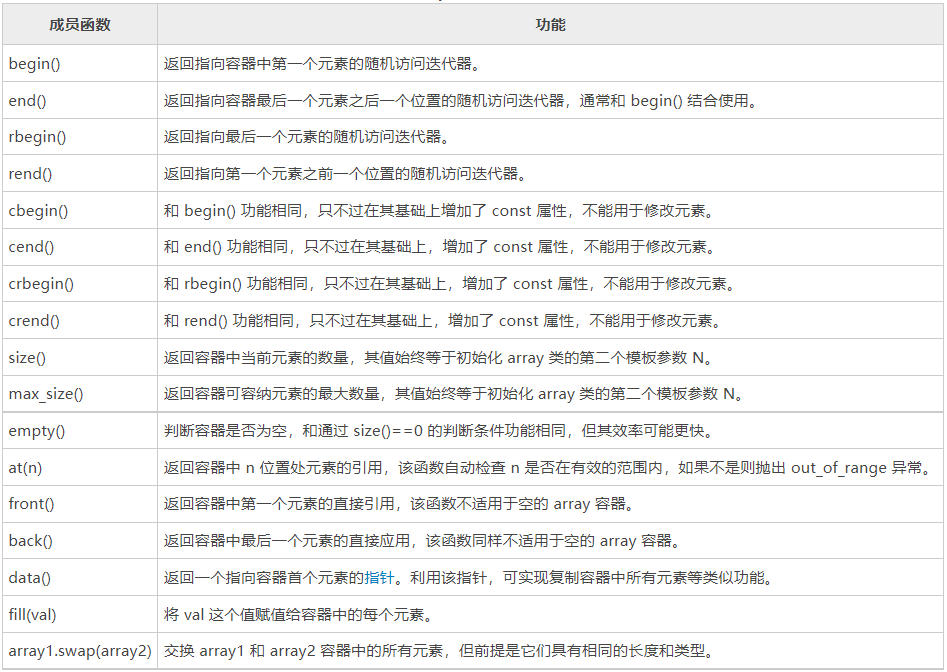
deque 容器也擅长在序列尾部添加或删除元素(时间复杂度为O(1)),而不擅长在序列中间添加或删除元素。
#include <deque>
using namespace std;
std::deque<int> d;

//相对于stack queue支持迭代器,前两者可以强制通过reinterpret_cast来使用迭代器
begin() 返回指向容器中第一个元素的迭代器。
end() 返回指向容器最后一个元素所在位置后一个位置的迭代器,通常和 begin() 结合使用。
rbegin() 返回指向最后一个元素的迭代器。
rend() 返回指向第一个元素所在位置前一个位置的迭代器。
cbegin() 和 begin() 功能相同,只不过在其基础上,增加了 const 属性,不能用于修改元素。
cend() 和 end() 功能相同,只不过在其基础上,增加了 const 属性,不能用于修改元素。
crbegin() 和 rbegin() 功能相同,只不过在其基础上,增加了 const 属性,不能用于修改元素。
crend() 和 rend() 功能相同,只不过在其基础上,增加了 const 属性,不能用于修改元素。

size() 返回实际元素个数。
max_size() 返回容器所能容纳元素个数的最大值。这通常是一个很大的值,一般是 232-1,我们很少会用到这个函数。
resize() 改变实际元素的个数。
empty() 判断容器中是否有元素,若无元素,则返回 true;反之,返回 false。
shrink _to_fit() 将内存减少到等于当前元素实际所使用的大小。

at() 使用经过边界检查的索引访问元素。

front() 返回第一个元素的引用。
back() 返回最后一个元素的引用。
assign() 用新元素替换原有内容。
push_back() 在序列的尾部添加一个元素。
push_front() 在序列的头部添加一个元素。
pop_back() 移除容器尾部的元素。
pop_front() 移除容器头部的元素。

insert() 在指定的位置插入一个或多个元素。
erase() 移除一个元素或一段元素。
clear() 移出所有的元素,容器大小变为 0。
swap() 交换两个容器的所有元素。
emplace() 在指定的位置直接生成一个元素。
emplace_front() 在容器头部生成一个元素。和 push_front() 的区别是,该函数直接在容器头部构造元素,省去了复制移动元素的过程。
emplace_back() 在容器尾部生成一个元素。和 push_back() 的区别是,该函数直接在容器尾部构造元素,省去了复制移动元素的过程。
// 但是对于原始数据需要提供类型
vec.emplace_back<std::array<int, 4>>({1,2,3,4});
// or
vec.emplace_back(std::array<int, 4>{{1, 2, 3, 4}});
- 自定义其中数据的优先级, 让优先级高的排在队列前面,优先出队
- 默认利用max-heap(大顶堆)完成对元素的排序,是以vector为表现形式的complete binary tree(完全二叉树)。
- 基本操作和queue一样。
#include <queue>
priority_queue<Type, Container, Functional>
- Type 就是数据类型,
- Container 就是容器类型(Container必须是用数组实现的容器,比如vector,deque等等,但不能用 list。STL里面默认用的是vector),
- Functional 就是比较的方式,当需要用自定义的数据类型时才需要传入这三个参数,使用基本数据类型时,只需要传入数据类型,默认是大顶堆
//降序队列(默认less<>), map/set默认也是使用less,但是是升序序列
priority_queue <int>q;
priority_queue <int,vector<int>,less<int> >q;
//升序队列
priority_queue <int,vector<int>,greater<int> > q;
自定义降序1 : class & struct
class _c{
public:
    bool operator () (const pair<int, int> &p, const pair<int, int> &q) const {
        return p.first < q.first;
    }
};
priority_queue<pair<int, int>, vector<pair<int, int>>, _c> pq;
struct Compare {
    bool operator()(const std::pair<TimeType, ipType>& a, const std::pair<TimeType, ipType>& b) const {
        if (a.first == b.first)
            return a.second < b.second;  // 第一元素相等时按第二元素降序
        return a.first > b.first;         // 第一元素按升序排列
    }
};
class MyClass {
public:
    std::priority_queue<std::pair<TimeType, ipType>, std::vector<std::pair<TimeType, ipType>>, Compare> _arpQueue;
};
自定义降序2 : decltype
class MyClass {
public:
    // 比较函数作为静态成员函数
    static bool cmp(const std::pair<TimeType, ipType>& a, const std::pair<TimeType, ipType>& b) {
        if (a.first == b.first)
            return a.second < b.second;  // 第一元素相等时按第二元素降序
        return a.first > b.first;         // 第一元素按升序排列
    }

    // 使用比较函数指针初始化优先队列
    std::priority_queue<std::pair<TimeType, ipType>, std::vector<std::pair<TimeType, ipType>>, decltype(&MyClass::cmp)> _arpQueue{cmp};
};
other
//自定义降序2
auto cmp = [](pair<int,int>&a, pair<int,int>&b){return a.second<=b.second;};
priority_queue<pair<int,int>,vector<pair<int,int>>, decltype(cmp)> q(cmp);
一般是题目要求自己实现链表,而不是使用STL提供的链表list。
// 单链表
struct ListNode {
    int val;  // 节点上存储的元素
    ListNode *next;  // 指向下一个节点的指针
    ListNode(int x) : val(x), next(NULL) {}  // 节点的构造函数
};

ListNode* head = new ListNode(5);
//或者
ListNode* head = new ListNode();
head->val = 5;

while(result != nullptr && result->val == val){
    ListNode* tmp_free = result;
    result = result->next;
    delete tmp_free; // 注意释放空间
}
nullptr 关键字
nullptr是一个关键字,可以在所有期望为NULL的地方使用。
- 与NULL一样,可与任何指针类型相比较。
- 与NULL不同,只能被赋值给指针类型,它不能隐式转换,也不能与整型相比较。与NULL通常被定义为整数0的宏定义 之间来区分。
STL list 容器,又称双向链表容器,即该容器的底层是以双向链表的形式实现的。
- 特点:
- 可以看到,list 容器中各个元素的前后顺序是靠指针来维系的,每个元素都配备了 2 个指针,分别指向它的前一个元素和后一个元素。其中第一个元素的前向指针总为 null,因为它前面没有元素;同样,尾部元素的后向指针也总为 null。
- vector是连续的容器,而list是非连续的容器,即vector将元素存储在连续的存储器中,而list存储在不连续的存储器中。
- 优点: list 容器具有一些其它容器(array、vector 和 deque)所不具备的优势
- 可以在序列已知的任何位置快速插入或删除元素(时间复杂度为O(1))。
- 并且在 list 容器中移动元素,也比其它容器的效率高。
- 缺点
- 不能像 array 和 vector 那样,通过位置直接访问元素。
- 举个例子,如果要访问 list 容器中的第 6 个元素,它不支持容器对象名[6]这种语法格式,
- 也不支持
find()语法,经常使用unorder_map<key, list<xxx>::iterator> listMap保存元素位置来加速查找。
- 正确的做法是从容器中第一个元素或最后一个元素开始遍历容器,直到找到该位置。
for (it = list.begin(); it != list.end(); it++) if (it->key == key) break;
- 应用场景:需要对序列进行大量添加或删除元素的操作,而直接访问元素的需求却很少,这种情况建议使用 list 容器存储序列。
//插入
push_front:在链表头部插入元素。
emplace_front(value_type&& val)
push_back:在链表尾部插入元素。
emplace_back(value_type&& val)
insert:在指定位置插入元素。list1.insert(list1.begin(), 0);
emplace(iterator pos, value_type val)

//删除
pop_front:删除链表头部的元素。
pop_back:删除链表尾部的元素。
erase:删除指定位置的元素。
remove:删除所有匹配的元素。
clear:清空链表。

//查询
size:返回链表的大小。
empty:检查链表是否为空。
front:返回链表的第一个元素。
back:返回链表的最后一个元素。
reverse:反转链表。
sort:对链表进行排序。
LRU 最久未被命中
- LRU需要更新数据结构中的元素信息,并且简单排序(就一个类时间的单指标)。
- 关联容器:虽然map,set能自动排序,但是是对key,不符合当前场景。
- 顺序容器:vector,list,deque。
- priority_queue:可以排序,但是不能更新。
- 信息包括,ID 和 类似timeTag的顺序。
- 可以使用list,从中间找到(unorder_map加速),直接插在末尾,利用线性的顺序和list修改中间元素的快速。
- 如果排序算法变复杂,可以用sort(list.begin(), list.end(), cmp)。
int array[2][3] = {
  {0, 1, 2},
  {3, 4, 5}
    };
数组 int a[1000] = {0}; 的分配位置
在 C/C++ 中,数组 int a[1000] = {0}; 的分配位置取决于它的声明位置。具体来说:
- 栈上(Stack):
- 如果数组是在函数内部声明的,并且不是
static 类型,那么它会被分配在栈上。
-
栈上的内存分配速度快,但栈的大小有限,通常为几 MB 到几十 MB,具体取决于操作系统和编译器设置。
-
静态区(Static):
- 如果数组是在全局作用域中声明的,或者在函数内部声明为
static 类型,那么它会被分配在静态区。
-
静态区的内存分配在程序启动时完成,持续到程序结束,不会在每次函数调用时重新分配。
-
堆上(Heap):
- 如果数组是通过动态内存分配函数(如
malloc、calloc、new 等)分配的,那么它会被分配在堆上。
- 堆上的内存分配和释放速度较慢,但堆的大小通常比栈大得多。
总结
- 栈上:函数内部声明的非
static 数组。
- 静态区:全局声明的数组或函数内部声明的
static 数组。
- 堆上:通过动态内存分配函数(如
malloc、calloc、new)分配的数组。
初始化为0
//直接初始化为0
int a[SIZE]={0};

#include<string.h>
int a[SIZE];
memset(a, 0, sizeof(a));
memset(a, 0, sizeof(int)*1000);//这里的1000是数组大小,需要多少替换下就可以了。
注意 memset是按照字节进行赋值,即对每一个字节赋相同值。除开0和-1,其他值都是不安全的,不会赋值期望的值。比如int是四个字节。
memset(a,127,sizeof(a)),全部初始化为int的较大值,即2139062143(int 最大值为2147483647);memset(a,128,sizeof(a)),全部初始化为一个很小的数,比int最小值略大,为-2139062144。
calloc & malloc
//区分
//calloc() 函数是动态申请内存函数之一,相当于用malloc函数申请并且初始化一样,calloc函数会将申请的内存全部初始化为0。
int *res = (int*)calloc(numsSize, sizeof(int));
//方法二:
int *res = (int*)malloc(numsSize * sizeof(int));
memset(res, 0, numsSize * sizeof(int));
//错误写法: memset(res, 0, sizeof(res)); res是指针变量,不管 res 指向什么类型的变量,sizeof( res ) 的值都是 4。
new的常见用法
int *p = new int();//此时p指向内存的单变量被初始化为0
int *p = new int (5);//此时p指向内存的单变量被初始化为5
int *p = new int[100]()//此时p指向数组首元素,且数组元素被初始化为0
//c++11 允许列表初始化,因此也有了以下几种形式形式
int *p = new int{}//p指向的单变量被初始化为0
int *p = new int{8}//p指向变量被初始化为8
int *p = new int[100]{}//p指向的数组被初始化为0
int *p = new int[100]{1,2,3}//p指向数组的前三个元素被初始化为1,2,3,后边97个元素初始化为0;
new 三维数组
建议老实用vector
int ***array;
// 假定数组第一维为 m, 第二维为 n, 第三维为h
// 动态分配空间
array = new int **[m];
for( int i=0; i<m; i++ )
{
    array[i] = new int *[n];
    for( int j=0; j<n; j++ )
    {
        array[i][j] = new int [h];
    }
}
//释放
for( int i=0; i<m; i++ )
{
    for( int j=0; j<n; j++ )
    {
        delete[] array[i][j];
    }
    delete[] array[i];
}
delete[] array;
Leetcode support VLA
- The C++ standard does not officially support Variable Length Arrays (VLA), but some compilers, such as g++ and Clang++, may accept it as valid syntax as an extension to the language.
- leetcode uses g++ 5.4.0 compiler for C++ compilation. It supports variable length array definitions. After ISO C99 specification, arrays with variable length declarations are allowed.
- The storage is allocated at the point of declaration and deallocated when the block scope containing the declaration exits.
- And memory consumption differ significantly.
class Solution {
public:
    int minimizeConcatenatedLength(vector<string>& words) {
        int n = words.size();
        int f[n][26][26];
- 与数组同样,array对象的长度也是固定的,
- 分配空间的规则也与数组类似,
- 其效率与数组相同,但更方便,更安全。
#include <array>

// array<typeName, nElem> arr;
array<int, 5> ai;
array<double, 4> ad = {1.1,1.2,1.2,1.3};

//通过如下创建 array 容器的方式,可以将所有的元素初始化为 0 或者和默认元素类型等效的值:
std::array<double, 10> values {};
//使用该语句,容器中所有的元素都会被初始化为 0.0。

//二维
std::array<std::array<int, 2>, 3> m = { {1, 2}, {3, 4}, {5, 6} };
vector是变长的连续存储:
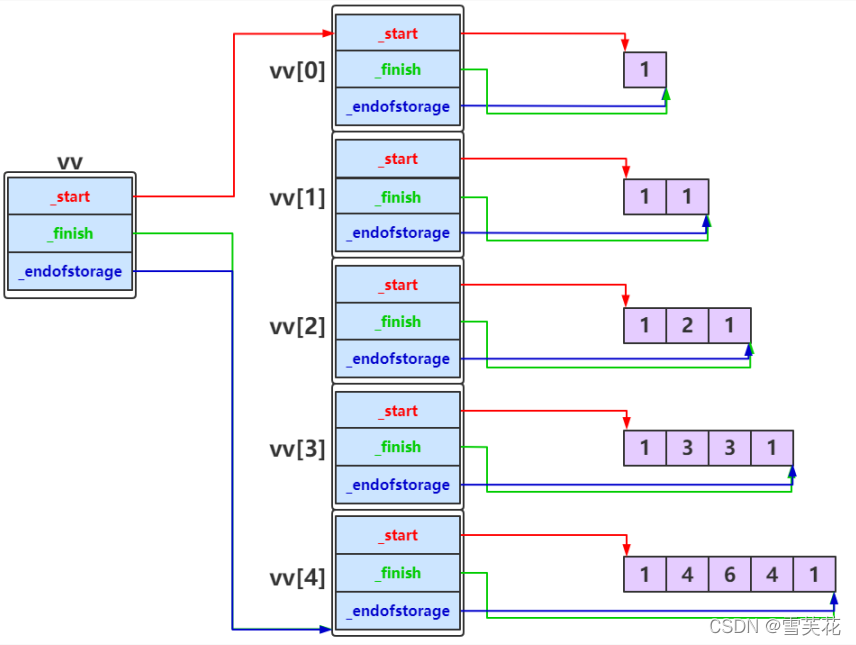
- 对于简单的类型,是直接存储
- 对于复杂的类,存储的是,该元素的信息(比如新构造元素的begin地址,end地址,capacity信息)
打印不同类型的vector存储内容的地址
vector<vector<int>> v2d(3,vector<int>(0));      // 间隔 6 个int
// vector<set<int>> v2d(3);                     // 间隔 12 个int
// vector<unordered_set<int>> v2d(3);           // 间隔 14 个int
// vector<map<int,int>> v2d(3);                 // 间隔 12 个int
// vector<unordered_map<int,int>> v2d(3);       // 间隔 14 个int

const int STEP = 6;
for(int i = 0; i<v2d.size(); i++){
    cout << " " << &v2d[i] << endl;
    for(int j=0; j<STEP; j++)
        cout << " " << hex << *(int *)((void *)(&v2d[i])+j*4);
    cout << endl;
}

// add elements to v2d[0]
const int ADDNUM = 10;
for(int i = 0; i<ADDNUM; i++){
    v2d[0].emplace_back(2);
    // v2d[0].insert(i);
    // v2d[0][i]=i*i;
}

// check the space change
cout << "Ele[0] size : " << v2d[0].size() << endl;
for(int i = 0; i<v2d.size(); i++){
    cout << " " << &v2d[i] << endl;
}

//check ele[0] location
cout << endl;
for(int i = 0; i<ADDNUM; i++){
    cout << " " << &v2d[0][i];
}
vector具体底层实现
(1)扩容
vector的底层数据结构是数组。
当vector中的可用空间耗尽时,就要动态第扩大内部数组的容量。直接在原有物理空间的基础上追加空间?这不现实。数组特定的地址方式要求,物理空间必须地址连续,而我们无法保证其尾部总是预留了足够空间可供拓展。一种方法是,申请一个容量更大的数组,并将原数组中的成员都搬迁至新空间,再在其后方进行插入操作。新数组的地址由OS分配,与原数据区没有直接的关系。新数组的容量总是取作原数组的两倍。
(2)插入和删除
插入给定值的过程是,先找到要插入的位置,然后将这个位置(包括这个位置)的元素向后整体移动一位,然后将该位置的元素复制为给定值。删除过程则是将该位置以后的所有元素整体前移一位。
(2)vector的size和capacity
size指vector容器当前拥有的元素个数,capacity指容器在必须分配新存储空间之前可以存储的元素总数,capacity总是大于或等于size的。
size() – 返回目前存在的元素数。即: 元素个数
capacity() – 返回容器能存储 数据的个数。 即:容器容量
reserve() --设置 capacity 大小
resize() --设置 size ,重新指定有效元素的个数 ,区别与reserve()指定 容量的大小
clear() --清空所有元素,把size设置成0,capacity不变
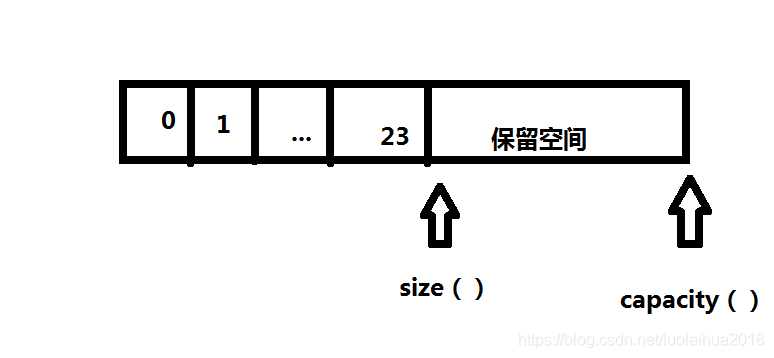
针对capacity这个属性,STL中的其他容器,如list map set deque,由于这些容器的内存是散列分布的,因此不会发生类似realloc()的调用情况,因此我们可以认为capacity属性针对这些容器是没有意义的,因此设计时这些容器没有该属性。
在STL中,拥有capacity属性的容器只有vector和string。
array,vector与数组的区别
共同点
(1.)都和数组相似,都可以使用标准数组的表示方法来访问每个元素(array和vector都对下标运算符[ ]进行了重载)
(2.)三者的存储都是连续的,可以进行随机访问
不同点
(0.)数组是不安全的,array和vector是比较安全的(有效的避免越界等问题)
(1.)array对象和数组存储在相同的内存区域(栈)中,vector对象存储在自由存储区(堆)malloc和new的空间也是在堆上,原因是栈的空间在编译代码的时候就要确定好,堆空间可以运行时分配。
(2.)array可以将一个对象赋值给另一个array对象,但是数组不行
(3.)vector属于变长的容器,即可以根据数据的插入和删除重新构造容器容量;但是array和数组属于定长容器
(4.)vector和array提供了更好的数据访问机制,即可以使用front()和back()以及at()(at()可以避免a[-1]访问越界的问题)访问方式,使得访问更加安全。而数组只能通过下标访问,在写程序中很容易出现越界的错误
(5.)vector和array提供了更好的遍历机制,即有正向迭代器和反向迭代器
(6.)vector和array提供了size()和Empty(),而数组只能通过sizeof()/strlen()以及遍历计数来获取大小和是否为空
(7.)vector和array提供了两个容器对象的内容交换,即swap()的机制,而数组对于交换只能通过遍历的方式逐个交换元素
(8.)array提供了初始化所有成员的方法fill()
(9.)由于vector的动态内存变化的机制,在插入和删除时,需要考虑迭代的是否有效问题
(10.)vector和array在声明变量后,在声明周期完成后,会自动地释放其所占用的内存。对于数组如果用new[ ]/malloc申请的空间,必须用对应的delete[ ]和free来释放内存
//创建一个vector,元素个数为nSize
vector(int nSize)

//指定值初始化,ilist5被初始化为包含7个值为3的int
//vector(int nSize,const t& t)
//创建一个vector,元素个数为nSize,且值均为t
vector<int> ilist5(7,3);

//区分列表初始化, 包含7 和 3两个元素
vector<int> ilist5{7,3};
//改变大小,预分配空间,增加 vector 的容量(capacity),但 size 保持不变。
vals.reserve(cnt.size());
// 将 vector 大小调整为 10,用 0 填充新位置
vec.resize(10, 0);
二维vector
// 二维vector, 两个维度的长度都未知时:
std::vector<std::vector<int>> matrix;

// 假设我们知道行数,但列数未知
int numRows = 3;

// 预先分配行数
matrix.resize(numRows);

// 动态添加列
matrix[0].push_back(1);
matrix[0].push_back(2);
matrix[1].push_back(3);
matrix[1].push_back(4);
matrix[2].push_back(5);
其余情况
//已知一个维度,第二维度为空
// vector<vector<bool>> name (xSize, vector<bool>(ySize, false));
vector<vector<int>> alphaIndexList{26, vector<int>(0)};

//或者
vector<int> alphaIndexList[26];
alphaIndexList[i].push_back(x);

//两个都不知道 ,也可以使用指针
vector<int>* todo;
todo= &alphaIndexList[i];
int n = todo->size(); // (*todo).size();
for(auto &x: *todo)
vector 也支持中间insert元素,但是性能远差于list。
void push_back(const T& x)      //向量尾部增加一个元素X
void emplace_back(const T& x)
//iterator insert(iterator it,const T& x)   :向量中迭代器指向元素前增加一个元素x
result.insert(result.begin()+p,x);     :在result的index为p的位置插入元素
iterator insert(iterator it,int n,const T& x) :向量中迭代器指向元素前增加n个相同的元素x
iterator insert(iterator it,const_iterator first,const_iterator last):向量中迭代器指向元素前插入另一个相同类型向量的[first,last)间的数据
iterator erase(iterator it)     :删除向量中迭代器指向元素
iterator erase(iterator first,iterator last):删除向量中[first,last)中元素
void pop_back()        :删除向量中最后一个元素
void clear()        :清空向量中所有元素
void swap(vector&)    :交换两个同类型向量的数据
void assign(int n,const T& x) :设置向量中前n个元素的值为x
void assign(const_iterator first,const_iterator last):向量中[first,last)中元素设置成当前向量元素

#include <algorithm> //或者#include <bits/stdc++.h>
reverse(a.begin(), a.end());
std::reverse(a,a+5);  //转换0~5下标的元素
元素排序
如果需要元素有序,考虑stable_sort
#include <algorithm>  // 包含 sort 函数
#include <functional> // 包含 std::greater 比较器

//默认是从低到高,加入std::greater<int>() 变成从高到低排序
sort(nums.begin(),nums.end(),std::greater<int>());

//vector of pair
vector<pair<int, char>> arr = {{a, 'a'}, {b, 'b'}, {c, 'c'}};

//c++11 using lambda and auto
std::sort(v.begin(), v.end(), [](auto &left, auto &right) {
    return left.second < right.second;
});
// or
sort(arr.begin(), arr.end(),
    [](const pair<int, char> & p1, const pair<int, char> & p2) {
    return p1.first > p2.first;
    }
);

//origin
struct sort_pred {
    bool operator()(const std::pair<int,int> &left, const std::pair<int,int> &right) {
        return left.second < right.second;
    }
};
std::sort(v.begin(), v.end(), sort_pred());
片段的截取
vector<int> Arrs {1,2,3,4,5,6,7,8,9}; // 假设有这么个数组,要截取中间第二个元素到第四个元素:2,3,4
vector<int>::const_iterator First = Arrs.begin() + 1; // 找到第二个迭代器
vector<int>::const_iterator Second = Arrs.begin() + 3; // 找到第三个迭代器
vector<int> Arrs2(First, Second); // 将值直接初始化到Arrs2
迭代器是指可在容器对象上遍访的对象
或者assign()功能函数实现截取
assign() 功能函数是vector容器的成员函数。原型:
1:void assign(const_iterator first,const_iterator last);//两个指针,分别指向开始和结束的地方
2:void assign(size_type n,const T& x = T()); //n指要构造的vector成员的个数, x指成员的数值,他的类型必须与vector类型一致!
vector<int> Arrs {1,2,3,4,5,6,7,8,9}; // 假设有这么个数组,要截取中间第二个元素到第四个元素:2,3,4
vector<int>::const_iterator First = Arrs.begin() + 1; // 找到第二个迭代器
vector<int>::const_iterator Second = Arrs.begin() + 3; // 找到第三个迭代器
vector<int> Arr2;
Arr2.assign(First,Second); //使用assign() 成员函数将Arrs对应位置的值存入Arrs2数组中
reference at(int pos)  :返回pos位置元素的引用
reference front()   :返回首元素的引用
reference back()   :返回尾元素的引用
iterator begin()   :返回向量头指针,指向第一个元素
iterator end()    :返回向量尾指针,指向向量最后一个元素的下一个位置
reverse_iterator rbegin() :反向迭代器,指向最后一个元素
reverse_iterator rend()  :反向迭代器,指向第一个元素之前的位置

// 判断函数
bool empty() const   :判断向量是否为空,若为空,则向量中无元素

// 大小函数
int size() const  :返回向量中元素的个数
int capacity() const :返回当前向量所能容纳的最大元素值
int max_size() const :返回最大可允许的vector元素数量值
返回表示
vector<int> func() {
    //sth
    return {it->second, i}; //no []
    //or
    return {};
}
#include<functional>
auto hash_p = [](const pair<int, int> &p) -> size_t {
            static hash<long long> hash_ll;
            return hash_ll(p.first + (static_cast<long long>(p.second) << 32));//64位高低一半存储x和y
        };
static_cast 用于良性类型转换,一般不会导致意外发生,风险很低。
hash <K> 模板专用的算法取决于实现,但是如果它们遵循 C++14 标准的话,需要满足一些具体的要求。这些要求如下:
- 不能拋出异常
- 对于相等的键必须产生相等的哈希值
- 对于不相等的键产生碰撞的可能性必须最小接近 size_t 最大值的倒数
https://www.runoob.com/w3cnote/cpp-vector-container-analysis.html
【C++容器】数组和vector、array三者区别和联系
https://blog.51cto.com/liangchaoxi/4056308
https://blog.csdn.net/y601500359/article/details/105297918
————————————————
版权声明:本文为CSDN博主「stitching」的原创文章,遵循CC 4.0 BY-SA版权协议,转载请附上原文出处链接及本声明。
原文链接:https://blog.csdn.net/qq_40250056/article/details/114681940
————————————————
版权声明:本文为CSDN博主「FishBear_move_on」的原创文章,遵循CC 4.0 BY-SA版权协议,转载请附上原文出处链接及本声明。
原文链接:https://blog.csdn.net/haluoluo211/article/details/80877558
————————————————
版权声明:本文为CSDN博主「SOC罗三炮」的原创文章,遵循CC 4.0 BY-SA版权协议,转载请附上原文出处链接及本声明。
原文链接:https://blog.csdn.net/luolaihua2018/article/details/109406092
————————————————
版权声明:本文为CSDN博主「鱼思故渊」的原创文章,遵循CC 4.0 BY-SA版权协议,转载请附上原文出处链接及本声明。
原文链接:https://blog.csdn.net/yusiguyuan/article/details/40950735


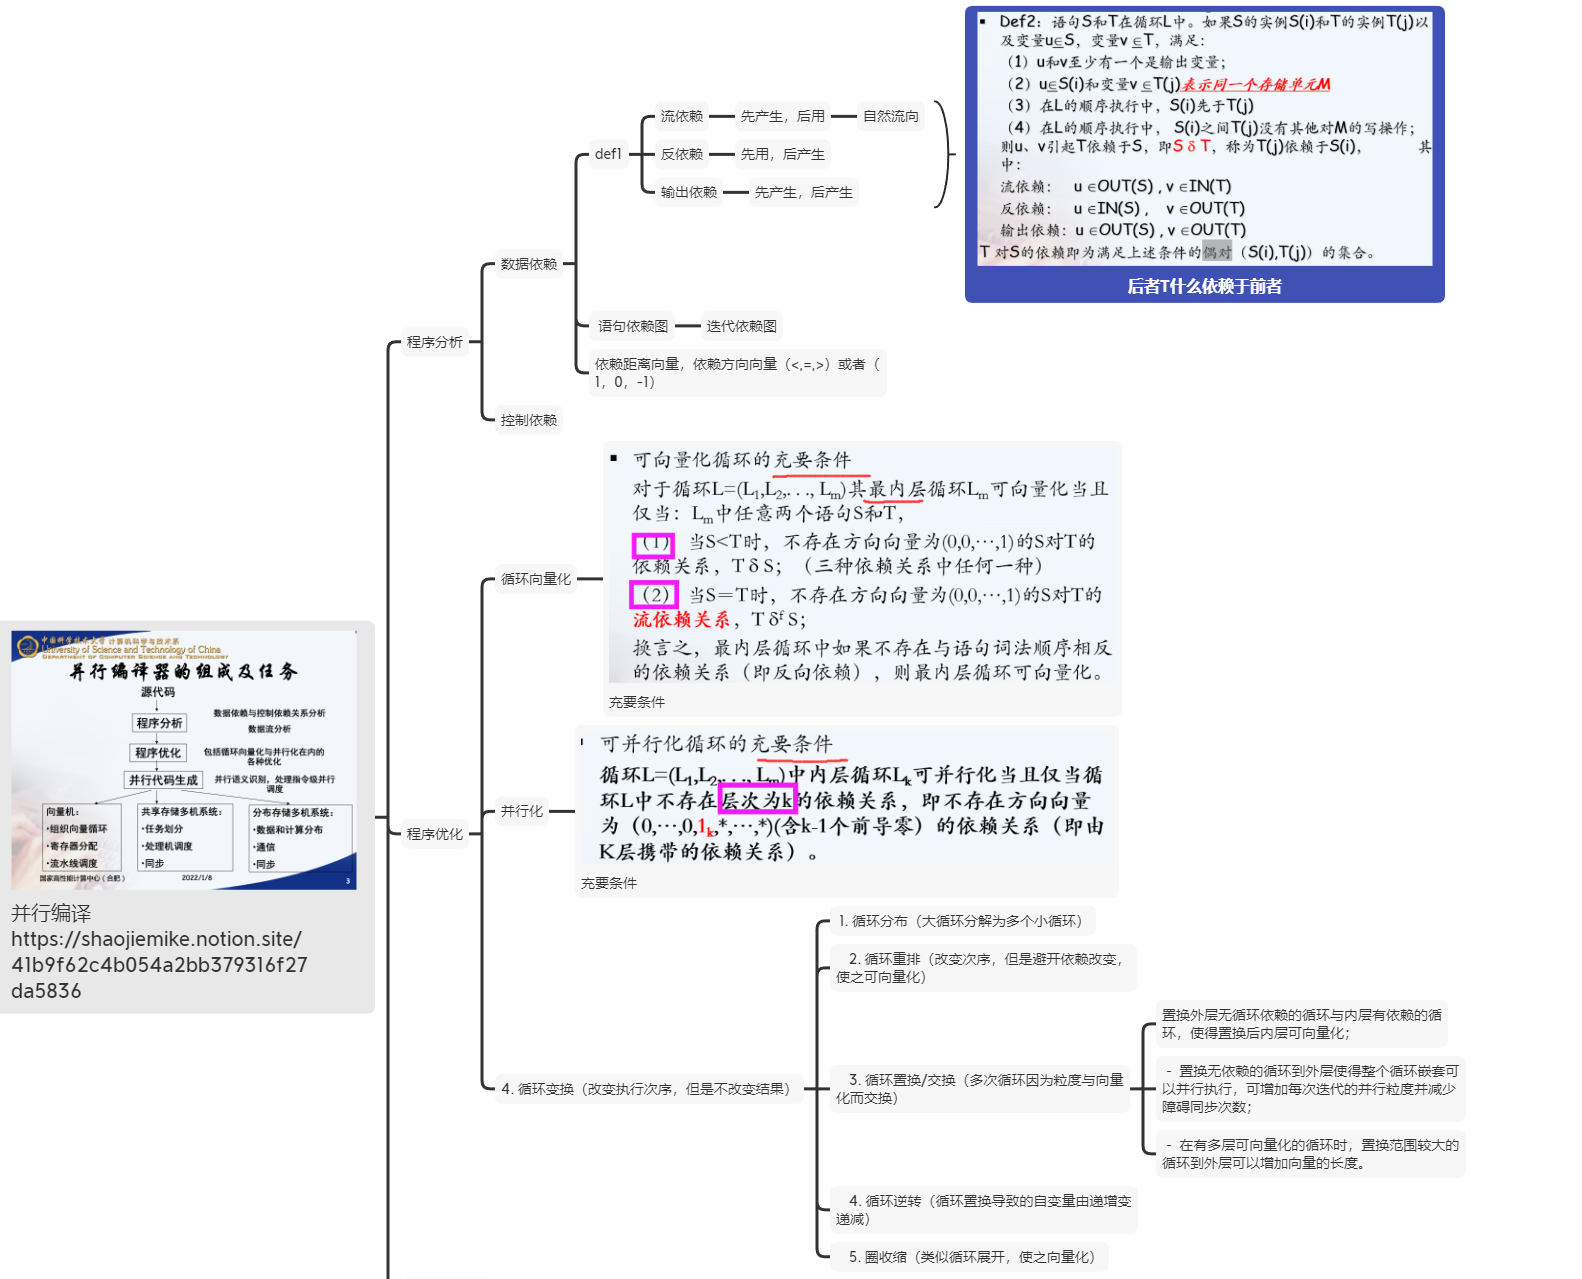 圈收缩(cycle shrinking)-此变换技术一般用于依赖距离大于1的循环中,它将一个串行循环分成两个紧嵌套循环,其中外层依然串行执行,而内层则是并行执行(一般粒度较小)
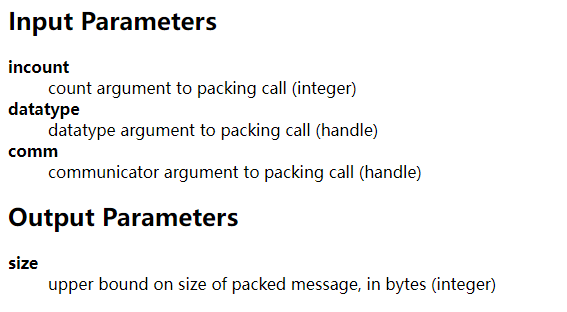
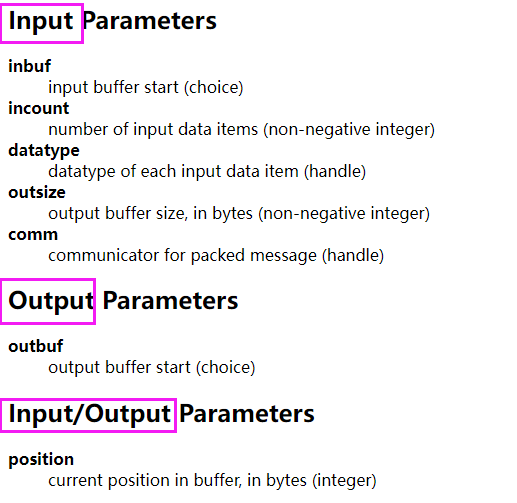 The input value of position is the first location in the output buffer to be used for packing. position is incremented by the size of the packed message,
 例子:
例子:
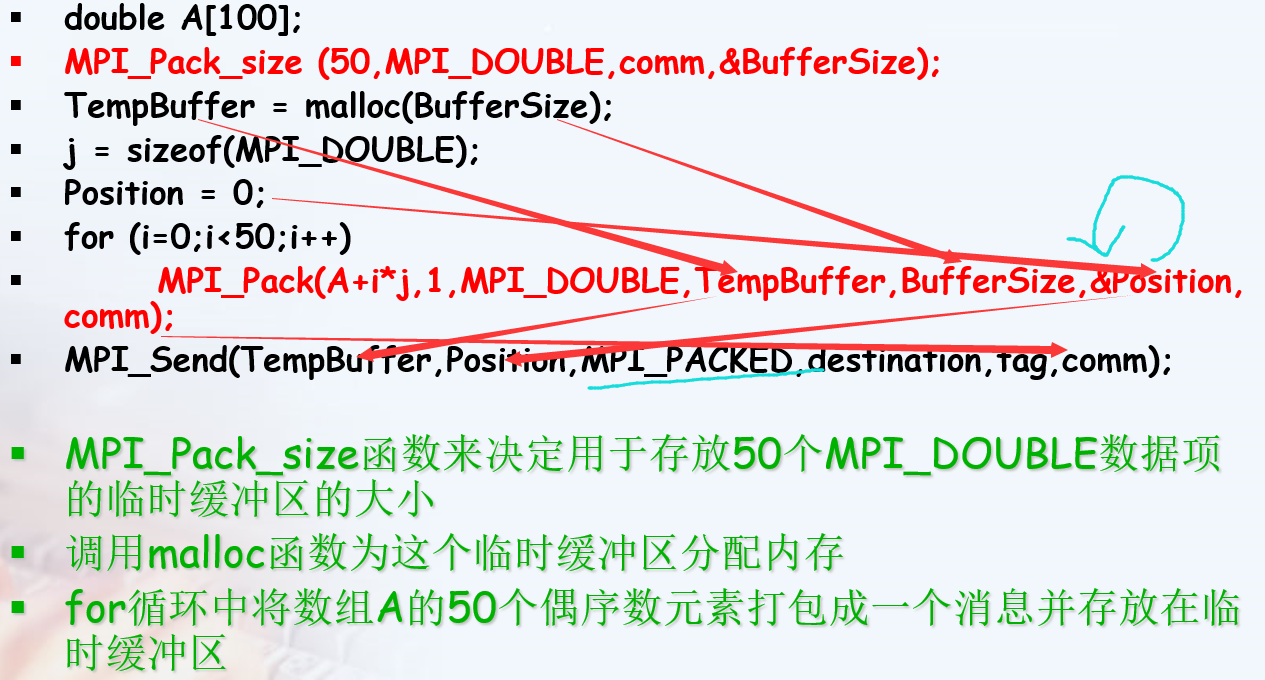 这里的
这里的
 特殊的函数
特殊的函数